
What Is ATutor LMS ?
Schools, non-profits, and businesses alike can benefit from a learning management system that can help mentor staff members, guide students through their home assignments, keep track of progress and success for all .
ATutor LMS is an Open Source Web-based Learning Management System (LMS), designed with accessibility and adaptability in mind. ATutor is used to create and deliver online courses, supports distance and distributed learning, and can be customized to fit almost any delivery context .
ATutor LMS is standards compliant, providing support for the IMS LTI standard that allows ATutor LMS courses to be launched from within other applications such as Blackboard Learn, Canvas, Brightspace by D2L, Moodle, Desire2Learn, Sakai OAE, and others .
Overview of ATutor Learning Management System :
What is an open source software ?
An open source software is a computer software that is released under a license in which the copyright holder grants users the right to study, change, and distribute the software to anyone and for any purpose.
An open source software is often developed in a public, collaborative manner .
What is the open source license of ATutor LMS ?
ATutor Learning management system is released under an open source license, the GNU General Public License (GPL). This means that ATutor LMS can be freely downloaded and used by anyone .
The GPL also allows for ATutor LMS to be modified and redistributed, as long as the resulting software product also adheres to the GPL .
This makes ATutor LMS an excellent choice for those who are looking for a flexible and customizable learning management system .
Who can use the ATutor LMS ?
ATutor LMS is a Learning Management System (LMS) that has been designed for use by people of all abilities .
The system is accessible and can be used by people with visual, hearing, or motor impairments . ATutor LMS is also usable by people who do not have English as their first language, as it has been translated into over 50 different languages .
How does ATutor LMS work ?
ATutor is an Open Source Web-based Learning Management System (LMS), designed with accessibility and adaptability in mind . ATutor LMS is used to create and deliver online courses. It can be installed on any server running PHP and MySQL .
ATutor LMS flexibility allows for customizations that can range from modifying its visual themes, to changing its underlying structure, to even developing integrations with other applications .
Prerequisites :
- Make sure your VPS server meets the minimum requirements for installing ATutor LMS .
That is to say , you need :
-
- Ubuntu 16.04 LTS operating system
- Webmin 1.900 or higher , with all installed packages up to date
- An SSH connection to your VPS server
- a MySQL database that should not be less than MySQL 4.1.10 .
How to know the MySQL version of your server ?
-
-
- go to your Webmin dashboard , at the following address :
-
http://ip_address_of_your_VPS_server:10000
-
-
- click on "Servers" tab
- click on "MySQL Database Server"
- Your database version is indicated , at the top of the page .
- phpMyAdmin 4.5.4.1 or higher , for database maintenance operations .
-
It is worth noting that you will need an account granted with all privileges
-
- 7zip 18.05 or higher , a free and open source utility that compress and archive files .
- a Web server ( preferably , Apache server 1.3 or 2 ) with or without a SSL certificate
- the Ip address of your VPS server ( in principle , it is given by your hosting provider )
- login credentials to the MySQL database of your server ( namely , database username and password )
- a number of dynamic extensions to be enabled in the php.ini file of your server .
More precisely , these extensions are :
-
-
- cURL :
-
“cURL” term stands for client URL Request Library .
As the name suggests , it’s a library whose purpose is to retrieve the content of a resource pointed to by a URL , via different transfer protocols .
These protocols apply , for example , to the transfer of Web pages content ( HTTP, HTTPS ) , messages ( HTTP, HTTPS, IMAP, POP3, SMTP ) , files ( FTP ) or directory access management ( LDAP ) .
-
-
- mbstring :
-
“mbstring” term is short form of “multibyte string” .
Most computer languages encode each character of a string on a byte , that is , a sequence of 8 digits that can only take values 0 or 1 .
This formalism does not allow a language to handle a character set ( also called “charset” ) of more than 2 ^ 8 = 256 symbols .
This can be problematic for some languages that need to manipulate a larger charset , like that of Japanese characters .
This is the reason why multibyte strings have been created .
This data format enables to store a character not necessarily on a single byte but potentially on several consecutive bytes .
Unfortunately , the PHP functions that handle traditional strings are poorly suited to this data format .
Indeed , they have trouble breaking these multibyte strings down because they do not effectively locate the beginning and the end of their characters .
( Remember that these can spread over several bytes )
This is where the PHP mbstring extension comes into play .
It contains a range of functions that make it easier to encode this type of data .
-
-
- MySQLi :
-
“MySQLi” extension is short form of “MySQL improved” extension .
As the name suggests , it comes as a replacement for MySQL extension , which is deprecated since PHP 5.5.0 and is no longer part of PHP 7.0.0 .
Its function is to enable PHP to access MySQL database servers .
-
-
- zlib :
-
It’s a data compression module that uses an algorithm called DEFLATE .
It is involved in many applications or services , such as HTTP .
In this special case , Web page data is compressed by the Web server before being sent to browsers .
Those who support this data display them , others only display their uncompressed version .
How can you concretely verify that these extensions are installed on your VPS server ?
A simple solution is to install on your server a
program which calls a function named phpinfo() .
This program , which contains no more than three lines of code , will then allow you to view the configuration of your server PHP environment and , in particular , the list of active extensions .
So you can deduce extensions that are not .
With this aim in mind ,
-
-
- return to your Webmin dashboard
- click on "Others" tab
- click on "File manager"
- go to /var/www/html/ folder
- select “File” menu
- click on “Create new file”
- enter “info.php” in “New file name” field
- right-click on “info.php” file to select it
- click on “Edit”
- copy/paste following code into the edition window :
-
<?php
phpinfo();
?>
-
-
- save and close the edition window
- run the program in your browser , with the following command :
-
http://ip_address_of_your_VPS_server/info.php
-
-
- You should see something like this :
-

N.B :
Note the PHP version of your server , which is displayed at the top of the page .
( As an example , on the screenshot above , this is PHP 7.0.33 )
As a point of interest , ATutor LMS developers recommend PHP 5.2.0 or higher .
In any case , it should not be less than PHP 5.0.2 .
Since extensions are alphabetically sorted , look for those with the name of cUrl , mbstring , MySQLi, and zlib .
Make sure you have information that looks like the following screenshots :


What if an extension is missing ?
If you can’t find one of the four screenshots above , it is because the associated extension is most likely missing or not enabled in your PHP environment .
To remedy this , I will show you how to install and enable each of them .
First of all ,
-
-
-
- click on Webmin "System" tab
- click on "Software packages"
- click on "Select from APT"
- click directly on "Search APT" button
-
-
Secondly ,
- in the pop-up window that appears , enter php-curl
- click on “Submit” button
- if you have PHP 7.x.x , select php7.0-curl module .
Otherwise , select the default module ; php-curl .
- click on “Install” button and wait for a few seconds
- once finished , click on “Return to Software Packages”
-
- Regarding mbstring :
-
Repeat the procedure above but this time replacing php-curl with php-mbstring and php7.0-curl with php7.0-mbstring .
-
-
- Concerning MySQLi :
-
Repeat the procedure above but this time replacing php-mbstring with php-MySQL and php7.0-mbstring with php7.0-MySQL .
-
-
- Dealing with zlib :
-
Repeat the procedure above but this time replacing php-MySQL with zlib1g-dev .
Now that the extensions are installed on your VPS server , all that remains is to enable them in your PHP environment .
In other words , you need to modify php.ini file .
To know where it is , a simple method is to search through the Webmin .
In order to do this ,
-
-
-
- click on Webmin "Others" tab
- click on "File manager"
- select “Tools” menu
- click on “Search”
- enter “php.ini” in “Query mask” field
- click on “Find”
-
-
Among the access paths that are displayed , the one searched starts with “etc” and includes the term "apache2".
For example ;
etc/php/7.0/apache2/php.ini
As you can see , this path usually depends on your PHP version .
-
-
- right-click on this path
- click on “Edit” to access your php.ini file
-
The Webmin text editor has the disadvantage of presenting the text on a dark background , making the characters difficult to read .
Given the importance of php.ini file , in the configuration of PHP environment parameters ( modules , directives , etc … ) , we can’t afford to make typing errors , because of a poor text visibility .
That's why I recommend you make changes to an intermediate file rather than directly to the original file .
In concrete terms ,
-
-
- select all text of your php.ini
-
( right- click into you text editor , then choose “select all” )
-
-
- right-click again then copy
- on your local pc , create a text document called php_backup.ini
- paste Webmin text editor into it
- save php_backup.ini without closing it
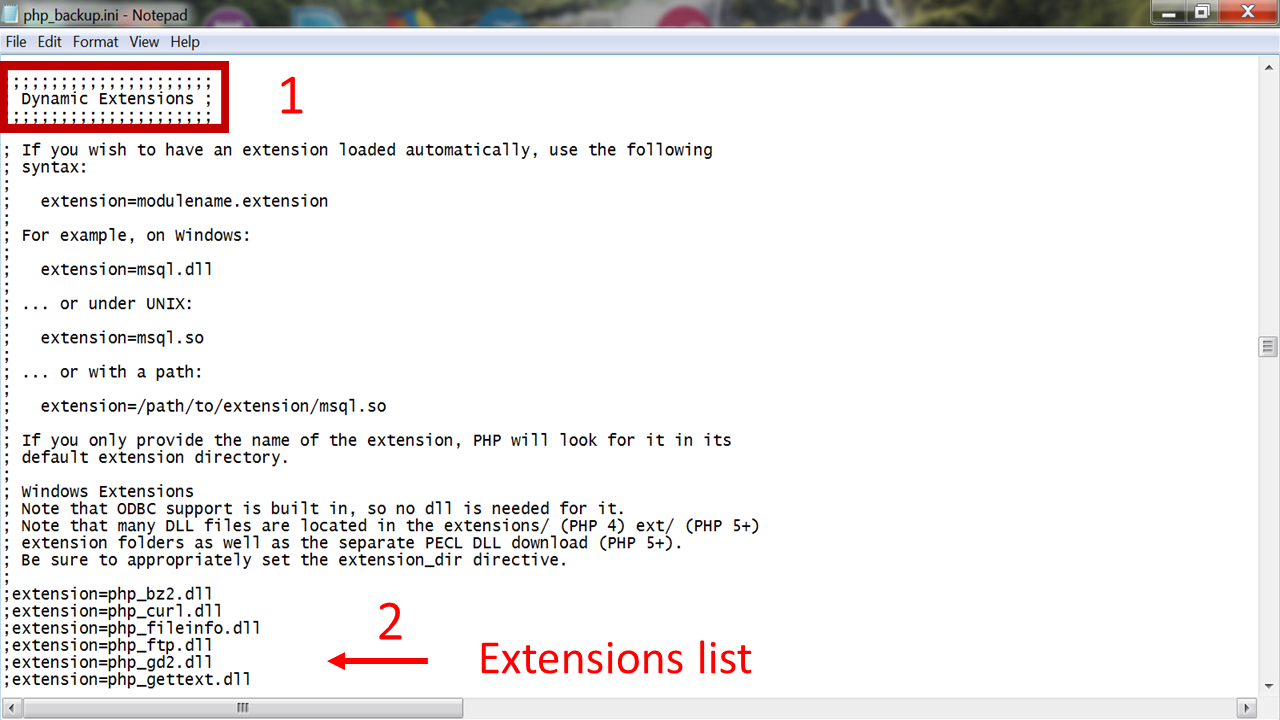
- in this file , search for “Dynamic extensions” section , as shown in the following screenshot :
-
-
-
- locate the list of dynamic extensions which is a series of modules whose name ends with .dll .
- In this list , to enable an extension , just uncomment the corresponding line ( that is , delete the semi-colon that starts the line ) .
-
On that basis , enable cUrl , mbstring and MySQLi modules .
-
-
- Regarding the zlib extension , the method is different .
-
To make it simple , copy/paste the following code , just after the series of dynamic extensions :
zlib.output_compression = On
zlib.output_compression_level = -1
The first line of code enables the module .
The second sets the compression level of the output data .
It is an integer value between -1 and 9 .
More precisely ,
-
-
-
- the higher it is , the smaller the size of compressed files
- when it is 0 , the data is not compressed
-
-
- when it is -1 , the compression level is set automatically by the server
-
-
- still in php.ini file , search for :
- File Uploads section
- "file_uploads" directive must be set to On
- "upload_max_filesize" option must be higher than or equal to 2MB
- File Uploads section
- still in php.ini file , search for :
-
( set it to 50MB , for instance )
-
-
-
- "post_max_size" option .
- its value must be higher than or equal to 8MB and higher than "upload_max_filesize" value
- "post_max_size" option .
-
-
( set it to 55MB , for instance )
-
-
-
- safe_mode directive .
-
-
If it is in the file then disable it , by setting it to Off .
Otherwise , his absence is normal .
Indeed , it is deprecated since PHP 5.3.0 and is no longer part of PHP 5.4.0 .
-
-
-
- sessions section .
- disable “session.auto_start” option , by setting it to 0
- uncomment the line ( delete its starting semi-colon ) corresponding to “session.save_path” option
- “PHP's default setting for include_path” sentence .
- sessions section .
-
-
Check that this default path contains a dot , like in ".;/path/to/php/pear"
-
-
- copy/paste php_backup.ini content into your server php.ini file
- save and close your server php.ini
- save and close php_backup.ini
-
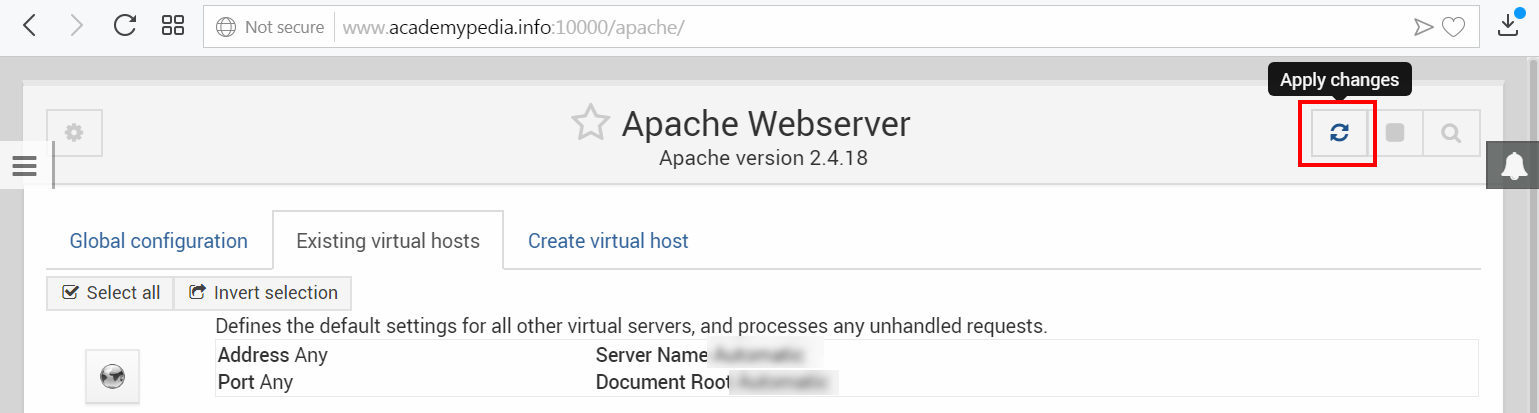
Now , to apply these changes you must restart the Apache Web Server .
With this in mind ,
-
-
- click on Webmin "Servers" tab
- click on "Apache Webserver"
- click on "Apply changes" icon , as shown in the screenshot below
-
- Download ATutor LMS on your local pc :
- go to the download section of ATutor LMS official website
- download the latest stable version ;
ATutor-X.X.X.tar.gz
-
- on your computer , create a dedicated folder and move the downloaded zipped file to this folder
- In Webmin , create a username and a group name ( a primary group , more precisely ) :
You will need it later to manage the ownership of your installation directory .
The goal is to increase the confidentiality of its data ( files and subdirectories ) , by restricting access to only members of the group .
With this aim in mind ,
-
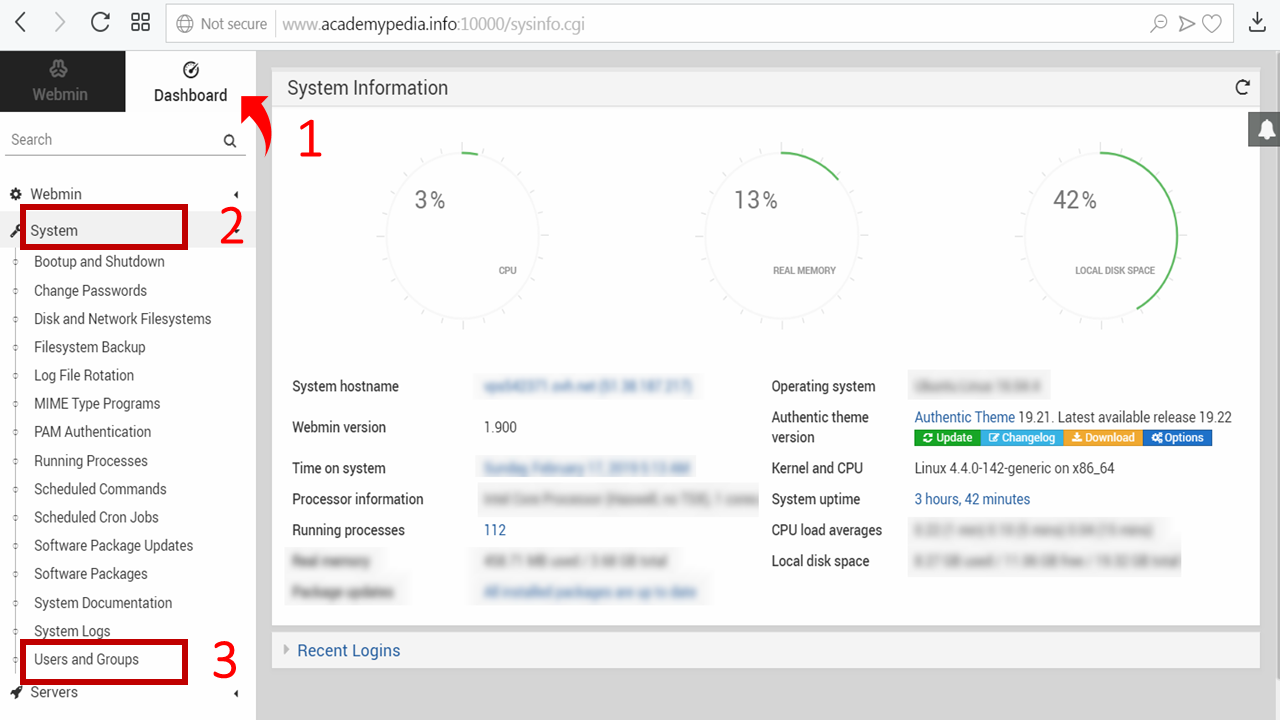
- go to Webmin dashboard
- click on "System"tab
- click on "Users and Groups"
-
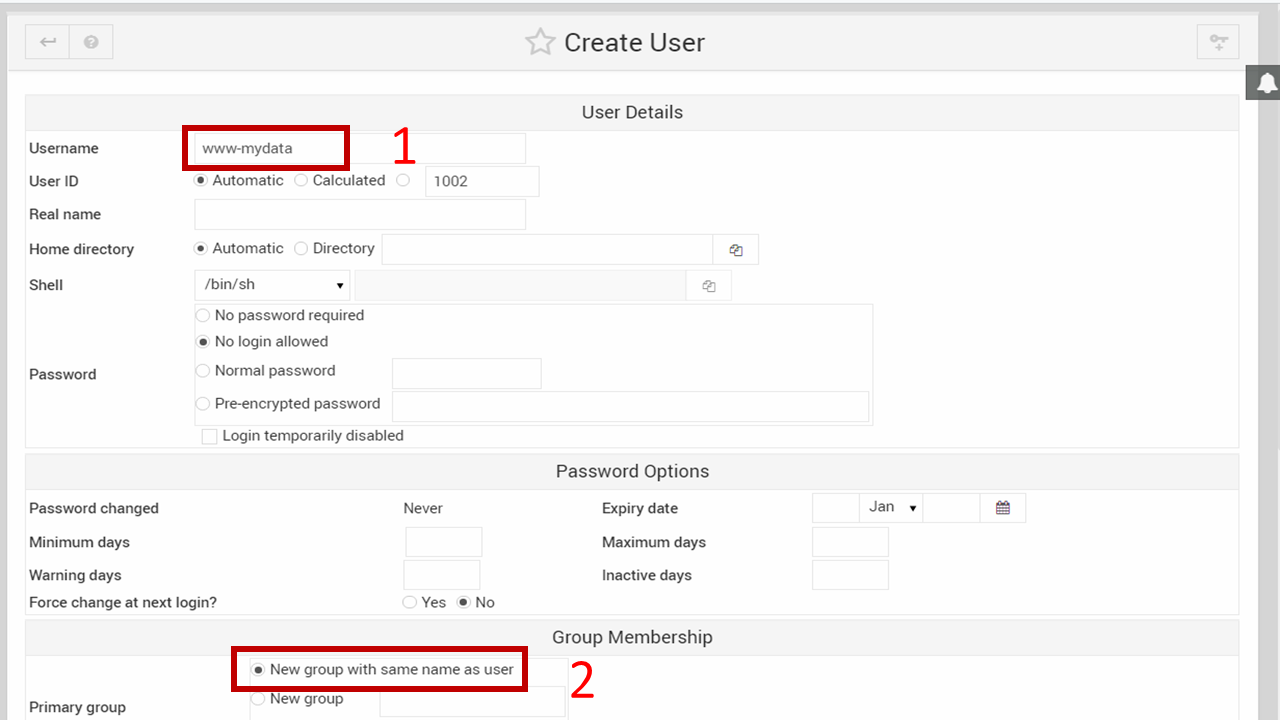
- click on “Create a new user”
- in “username” field , enter www-mydata , for instance
- in “primary group” section , you have three options .
Adding the new user www-mydata to
-
-
- a new group of the same name
- a new group of different name
- an existing group
-
Choose the one that suits you .
In the rest of this tutorial , I suppose the option chosen is the first one .
- leave the other parameters unchanged and click on “Create” button
Installation procedure :
- go to Webmin dashboard
- click on "Others"tab
- click on "File manager"

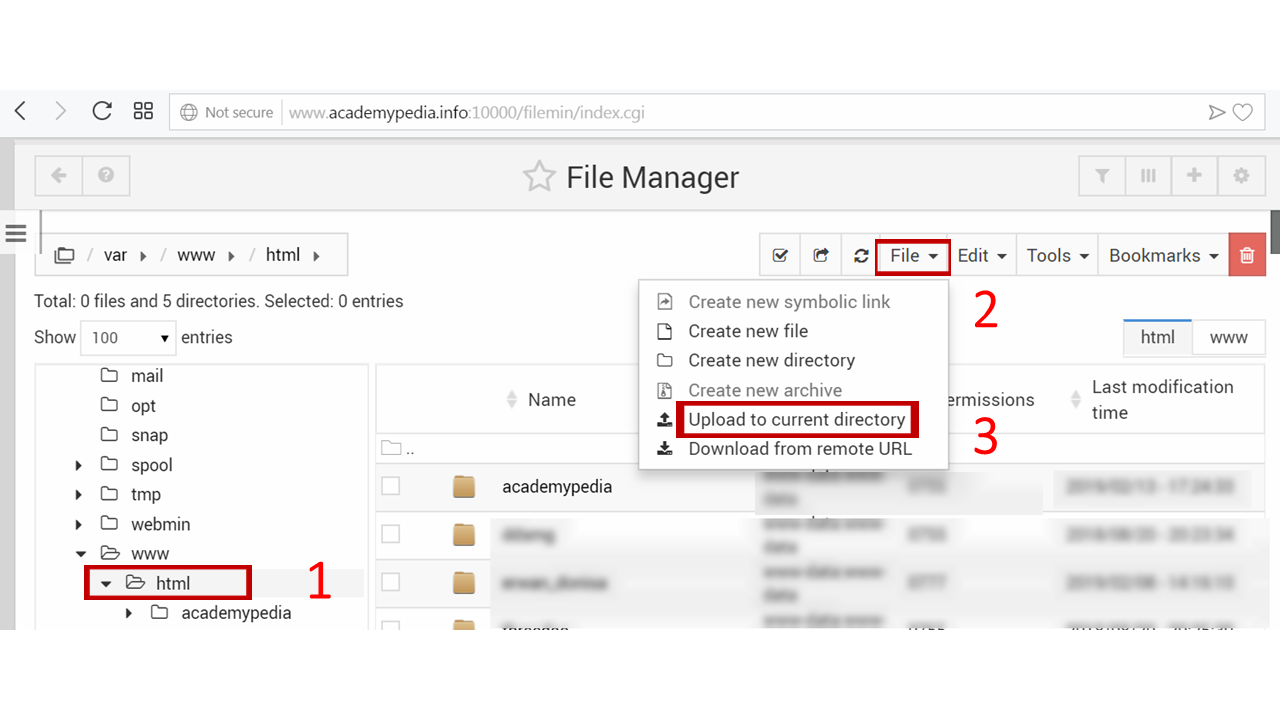
- upload ATutor-X.X.X.tar.gz on your VPS server :
To do that ;
-
- go to /var/www/html/ folder
- select “File” menu
- click on “Upload to current directory”
-
- drag and drop ATutor-X.X.X.tar.gz
- click on “Uploaded” button and wait for a few seconds ( that depends on your server performance )

-
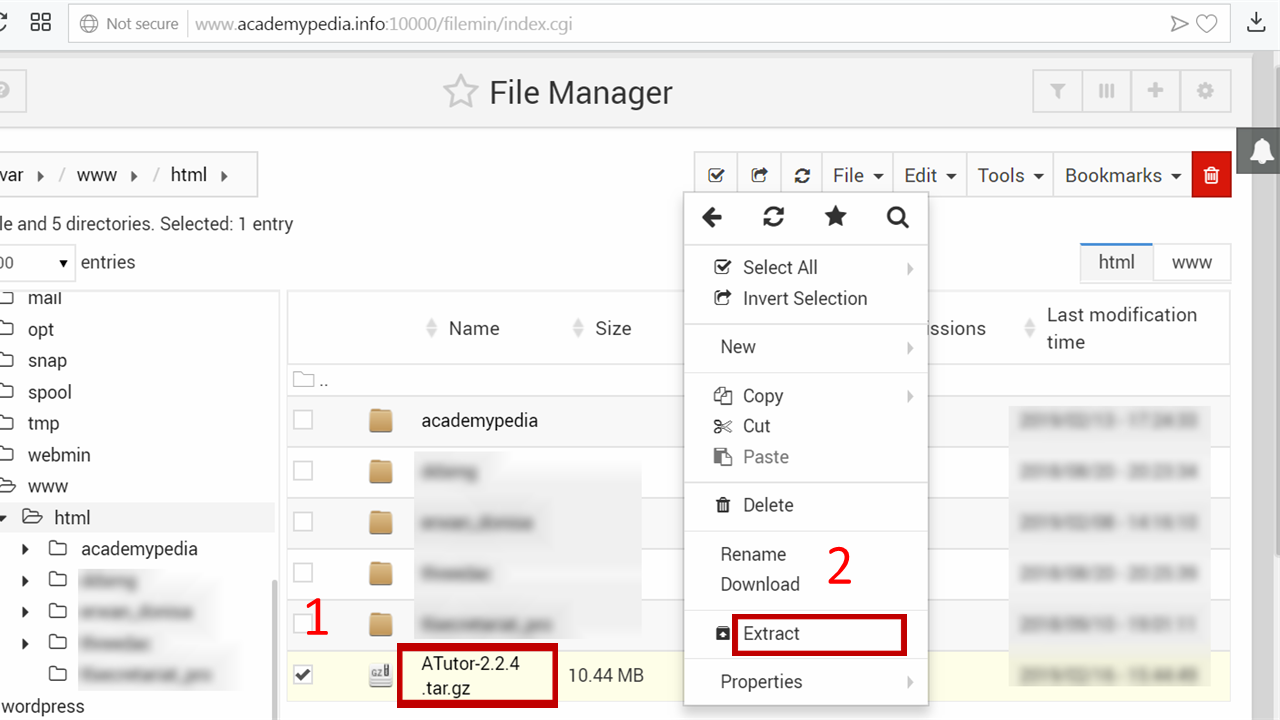
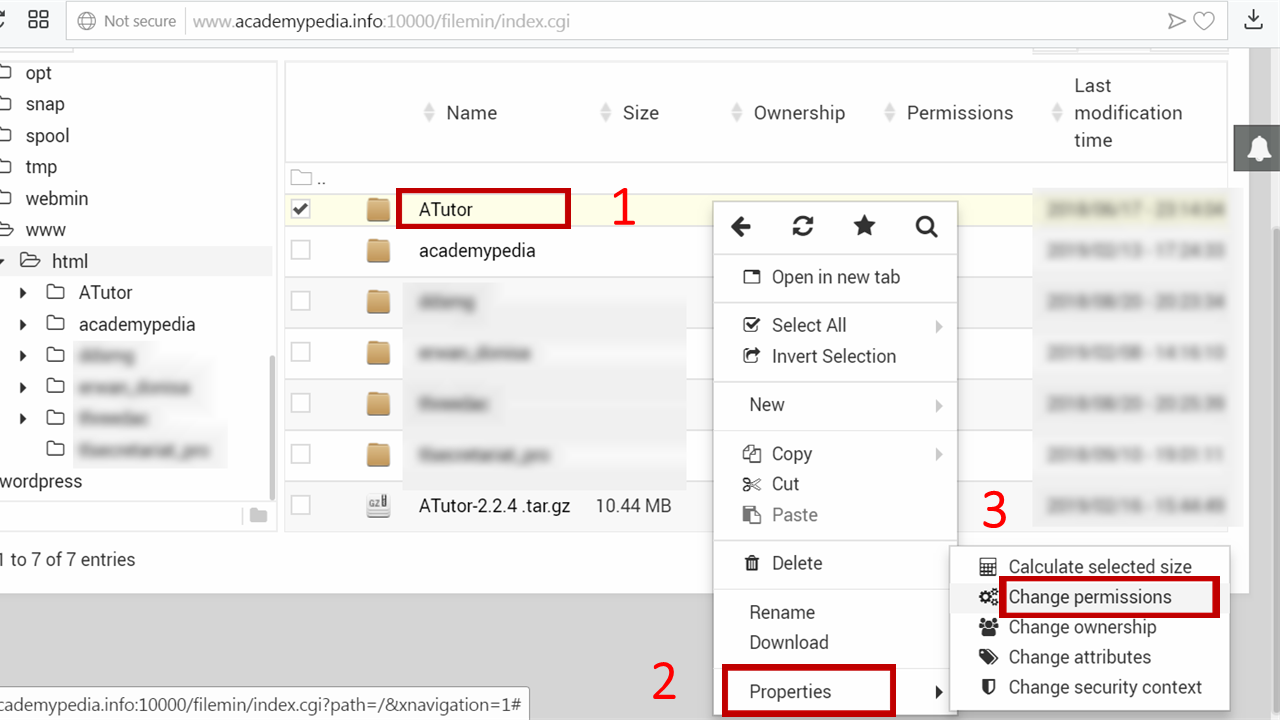
- once uploaded , right-click on the zipped file to select it
- click on “Extract”
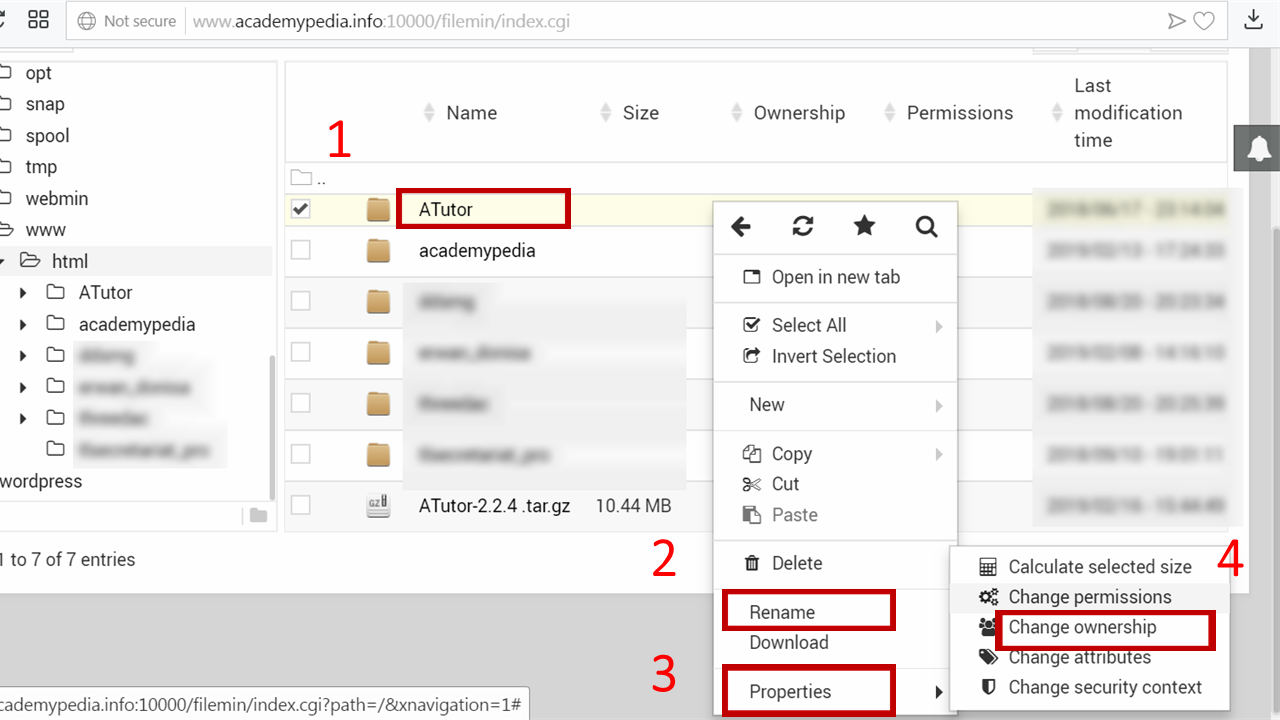
- right-click on the extracted folder ATutor and rename it atutor , in lowercase
- change its ownership to www-mydata:www-mydata , for instance , recursively .
- In order to do this :
- select “atutor” folder
- click on “change ownership”
- In order to do this :
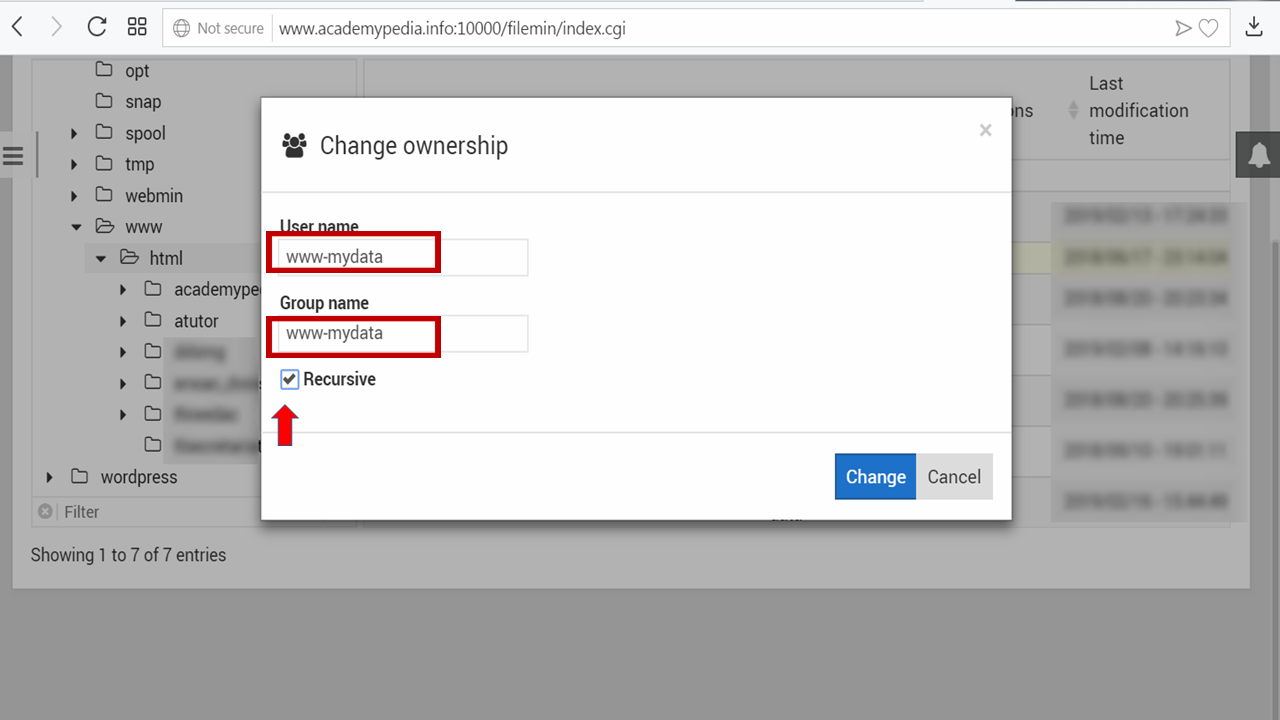
-
-
- set user name and group name to www-mydata:www-mydata , for instance
- check “Recursively”
- click on “Change” button
-
- change its permissions :
- proceed in the same way as previously but this time by changing permissions
- set them to 0755
- opt for “Apply to All ( recursive )”
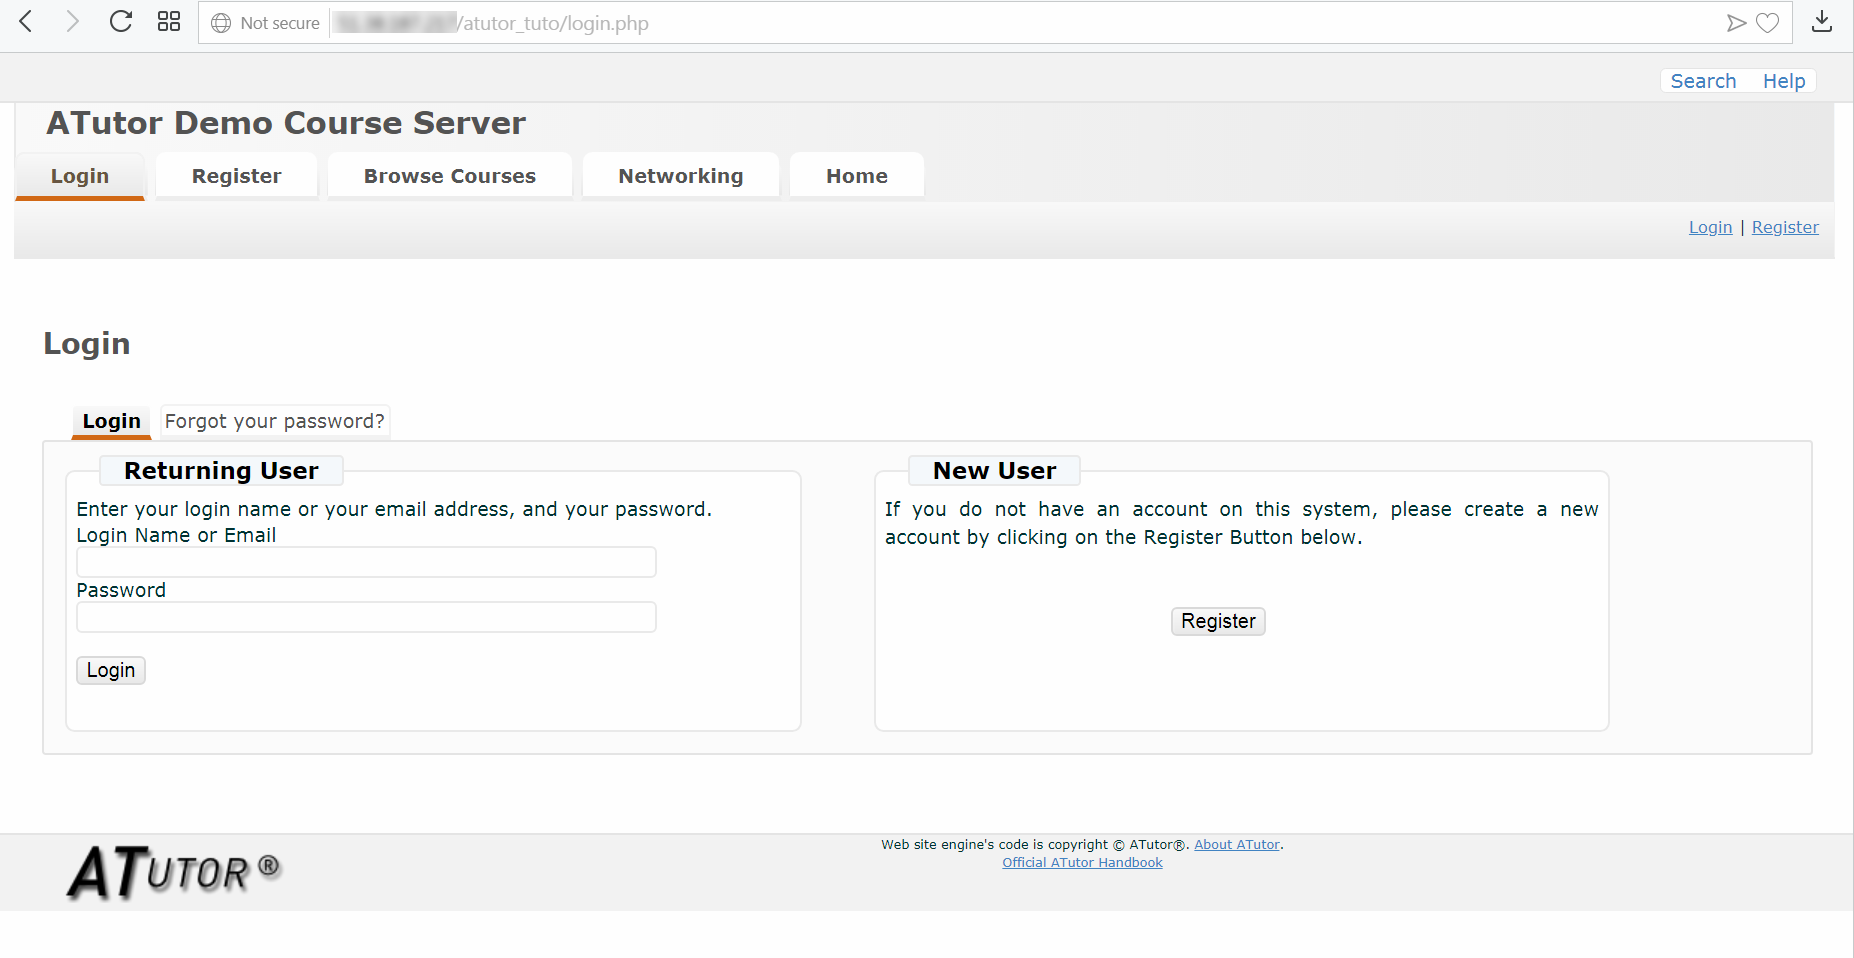
At this stage of the procedure , the embryonic version of the platform can already be accessed online , at the following address :
http://ip_address_of_your_VPS_server/atutor
Then this page is displayed :
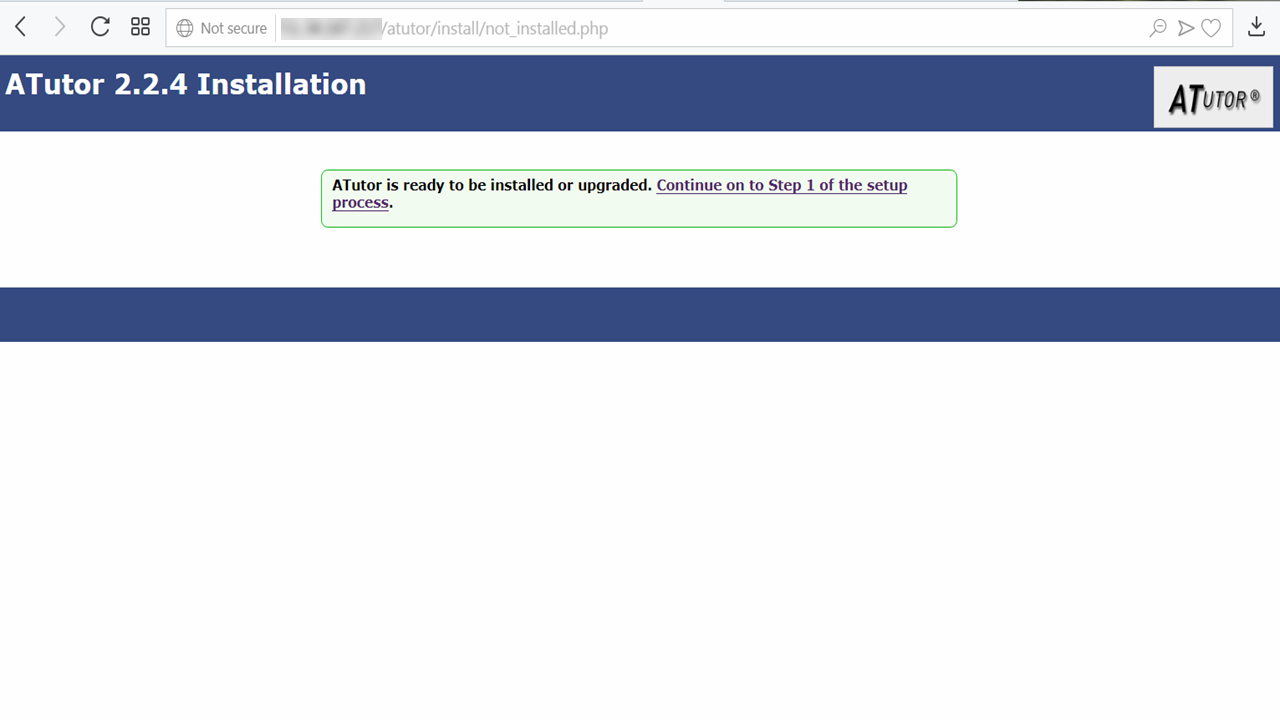
- click on “Continue on to Step 1 of the setup process”
- The different minima required for the installation of your virtual learning environment ( VLE ) are summarized .
Normally , your platform should pass all compliance tests .
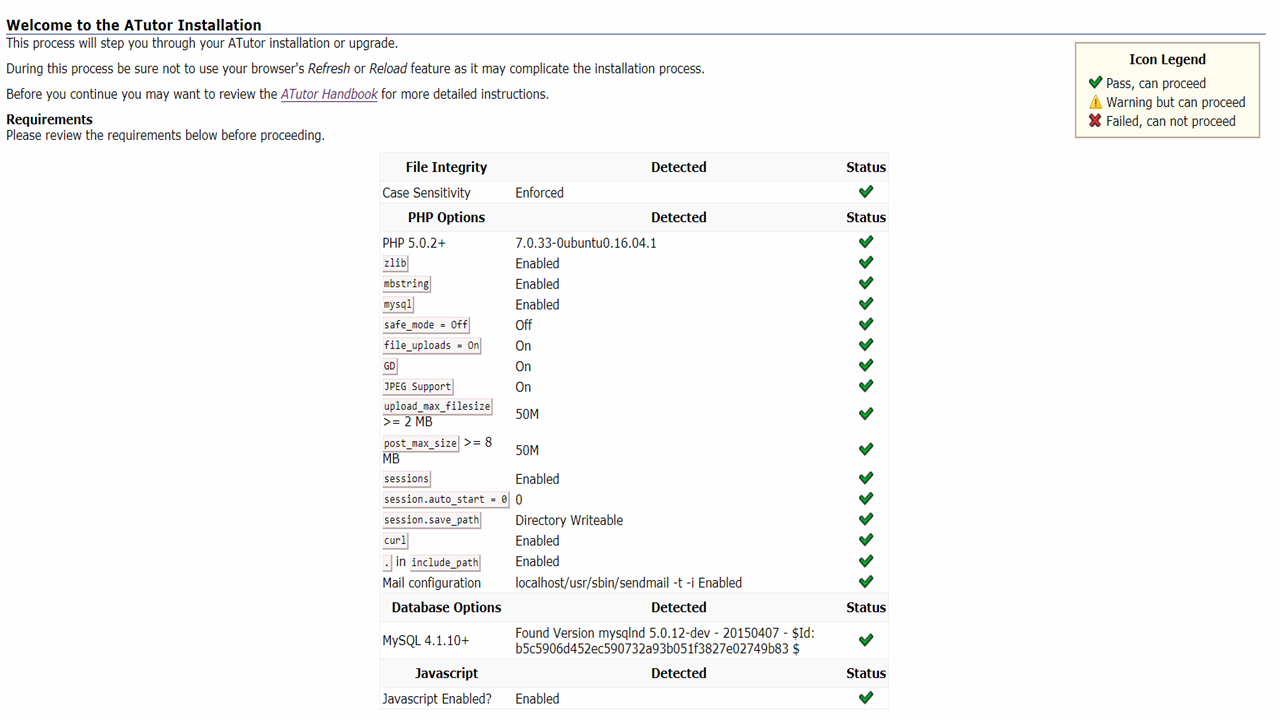
Nevertheless , if this is not so , 4 solutions open up to you :
- review the "Prerequisites" section of this procedure to verify that you have not omitted a detail
- if you followed the procedure and the problem persists , refer to the "Requirements & Recommendations" section of the official ATutor installation handbook .
You can read it at the following address :
http:// ip_address_of_your_VPS_server /atutor/documentation/admin
3. Send me a message using the "Leave a reply" form , at the end of this article , detailing the problem .
I will then give you indications to solve it , as far as possible .
4. check out ATutor support forum archive
5. report your issue to the developers community of this VLE , on GitHub
( In any case , if you receive simple warning messages , you can continue the procedure )
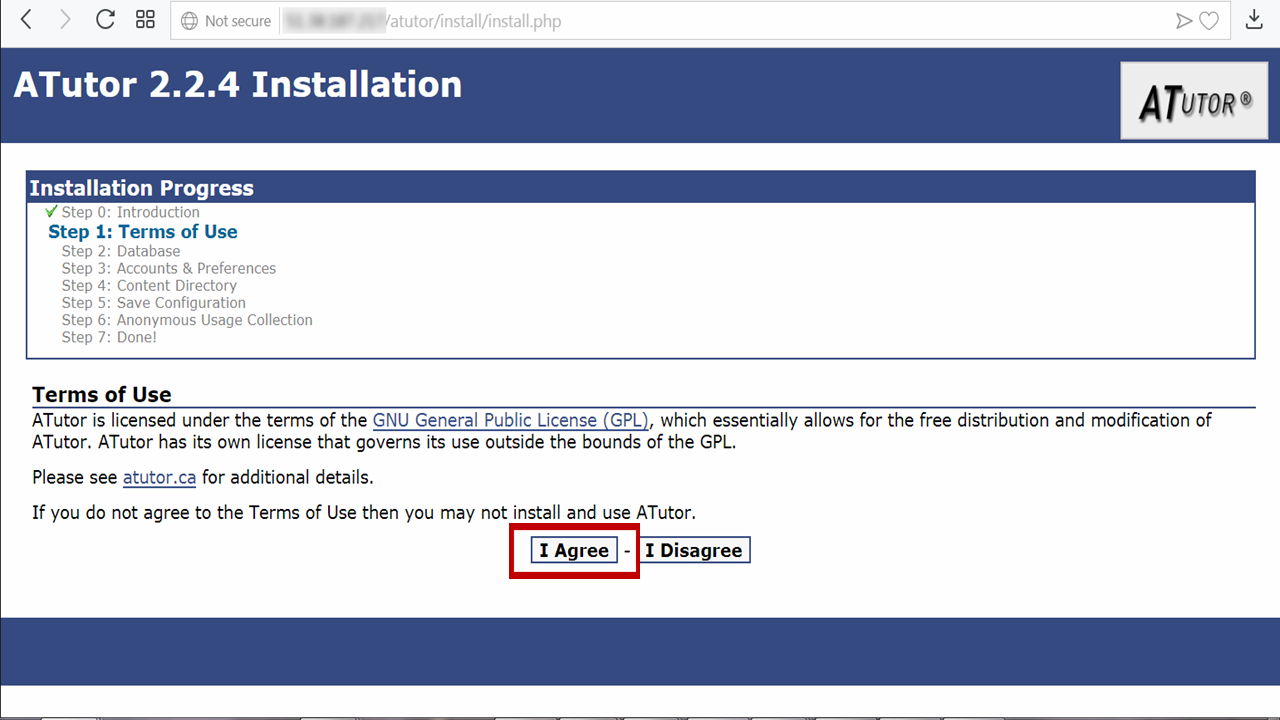
- assuming you’ve passed all tests , click on “Install” button

- read the LMS terms of use and click on “I Agree” button , if you accept them
- connecting ATutor LMS to your server MySQL database :
- if you do not have any particular customization to do , you can leave database hostname , port , name and table prefix fields unchanged
- enter the username and password provided by your hosting provider
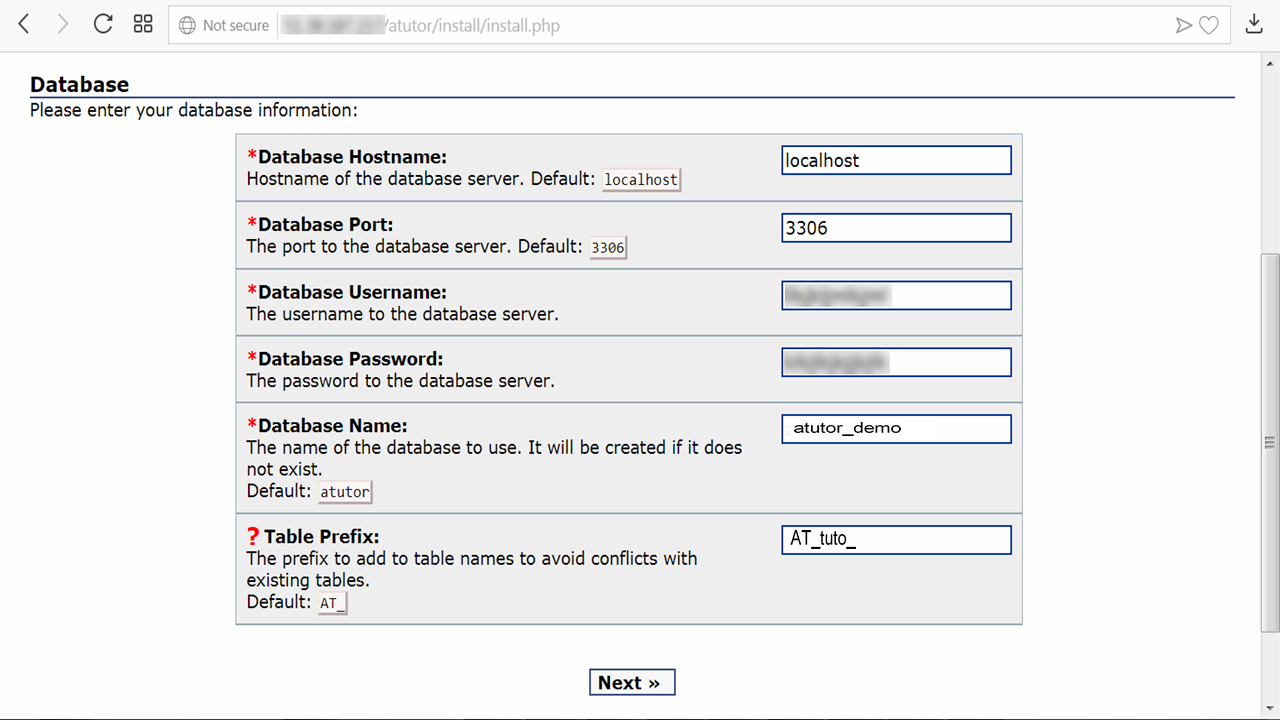
-
- click on “Next” button
- if the connection could be established with your MySQL database , then the following page is displayed :
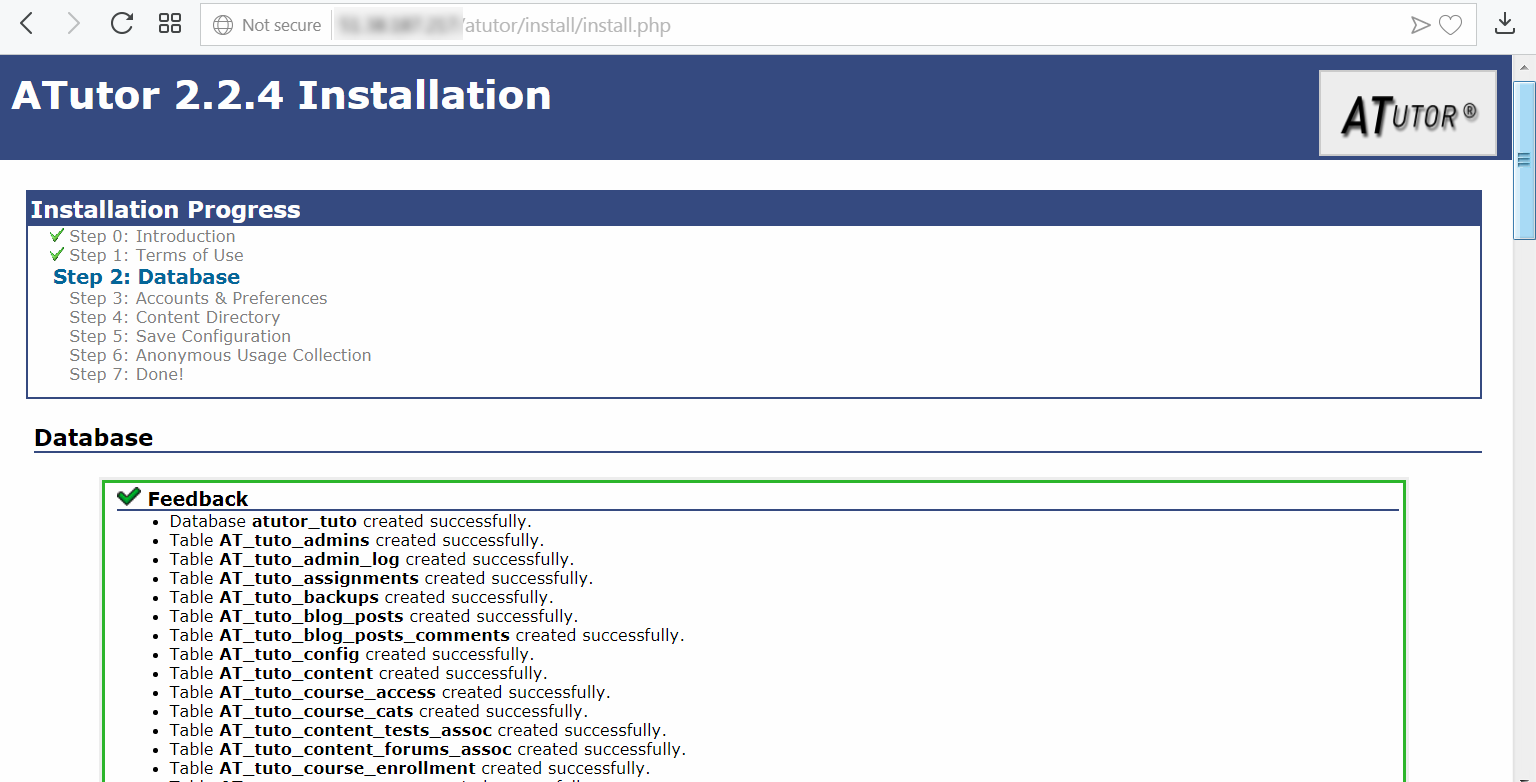
- click on “Next” button
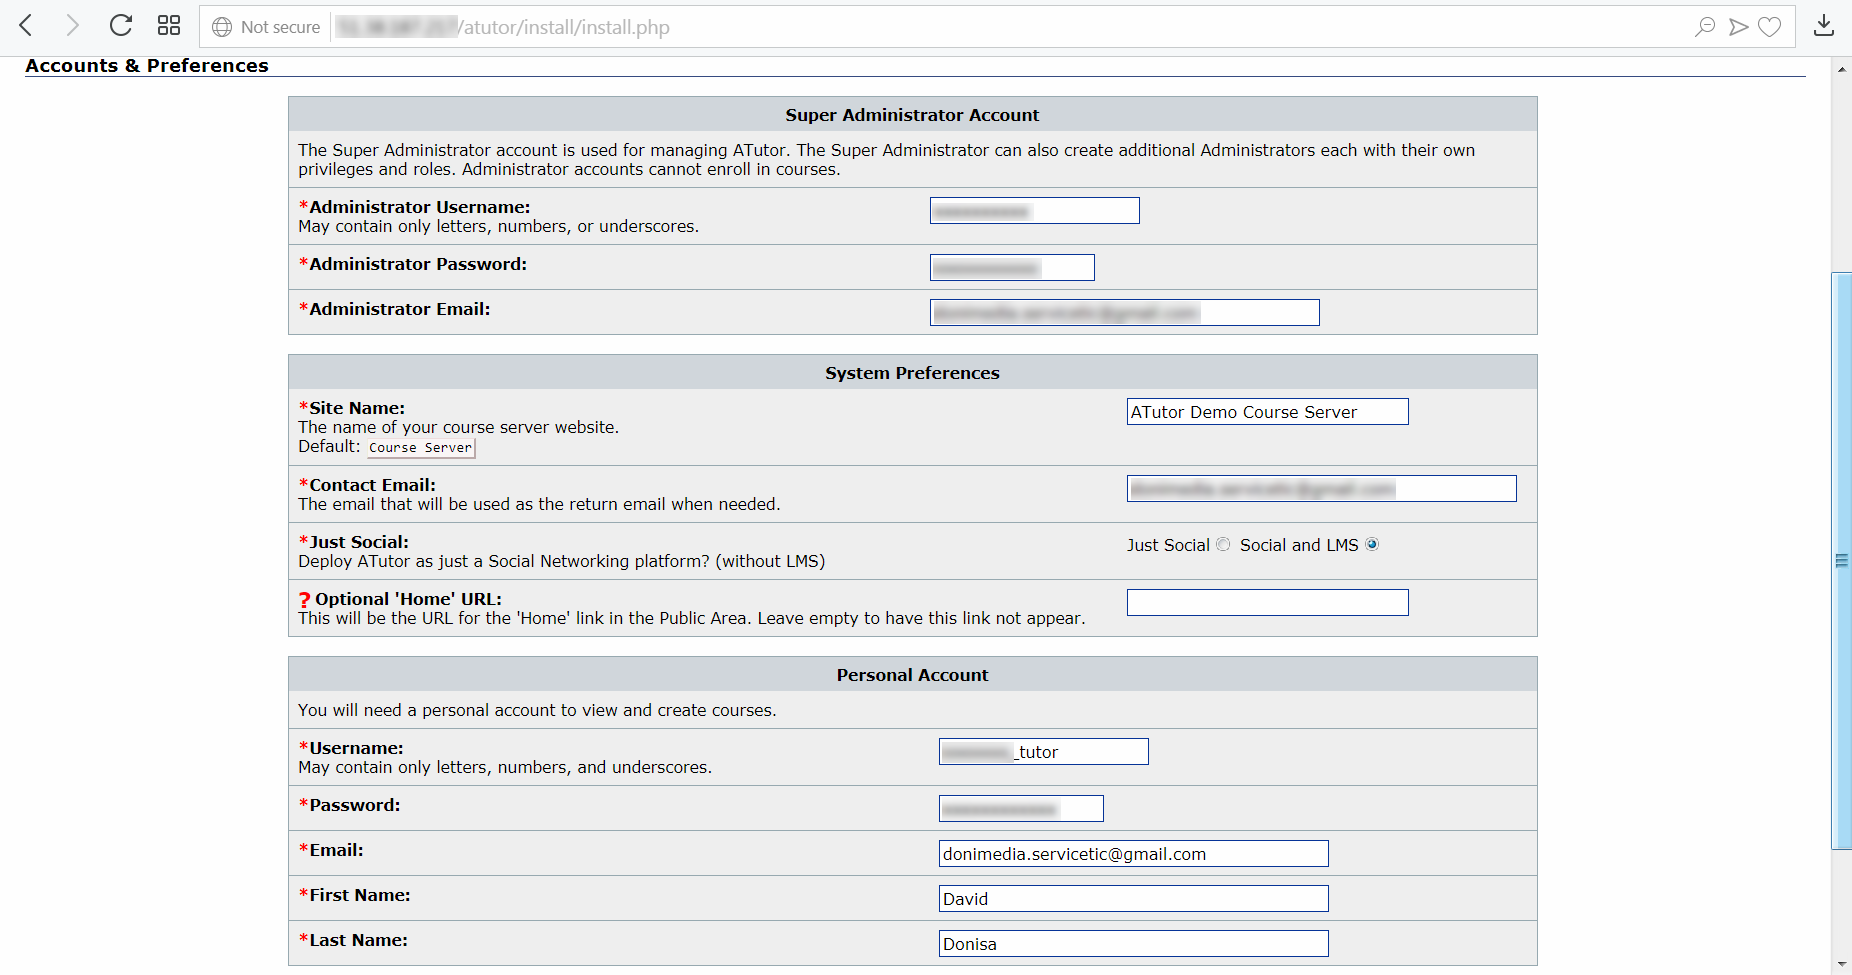
- manage your accounts and your preferences :
- as for your super administrator account , enter the administrator username , password and e-mail .
Given the importance of this account , I recommend that you secure it with a strong password .
That is , in this case , with a password containing both letters ( if possible in uppercase and lowercase ) , numbers and underscores
-
- regarding system preferences ,
- site name : enter the name of your course server
- enter a contact e-mail address
- dealing with “Just social” feature , opt for a “Social and LMS” deployment
- Leave “Home Url” field empty , if you do not have a specific address to indicate
- concerning your personal account , it allows you to create courses , unlike super administrator account .
- enter a username : proceed in the same way as for the previous account
- same remark for the password
- complete the remaining fields .
- regarding system preferences ,
Namely , your first name , last name and e-mail
It should be noted that your super administrator account gives you the right to :
- create additional administrator accounts and grant them privileges
- make these accounts active or inactive ;
In the first case , accounts are created but with limited use .
In the second , the accounts are created but no privilege is given to them .
This being said , you can’t create courses with this type of account .
You must go through a personal account to do it !
- go to the next step
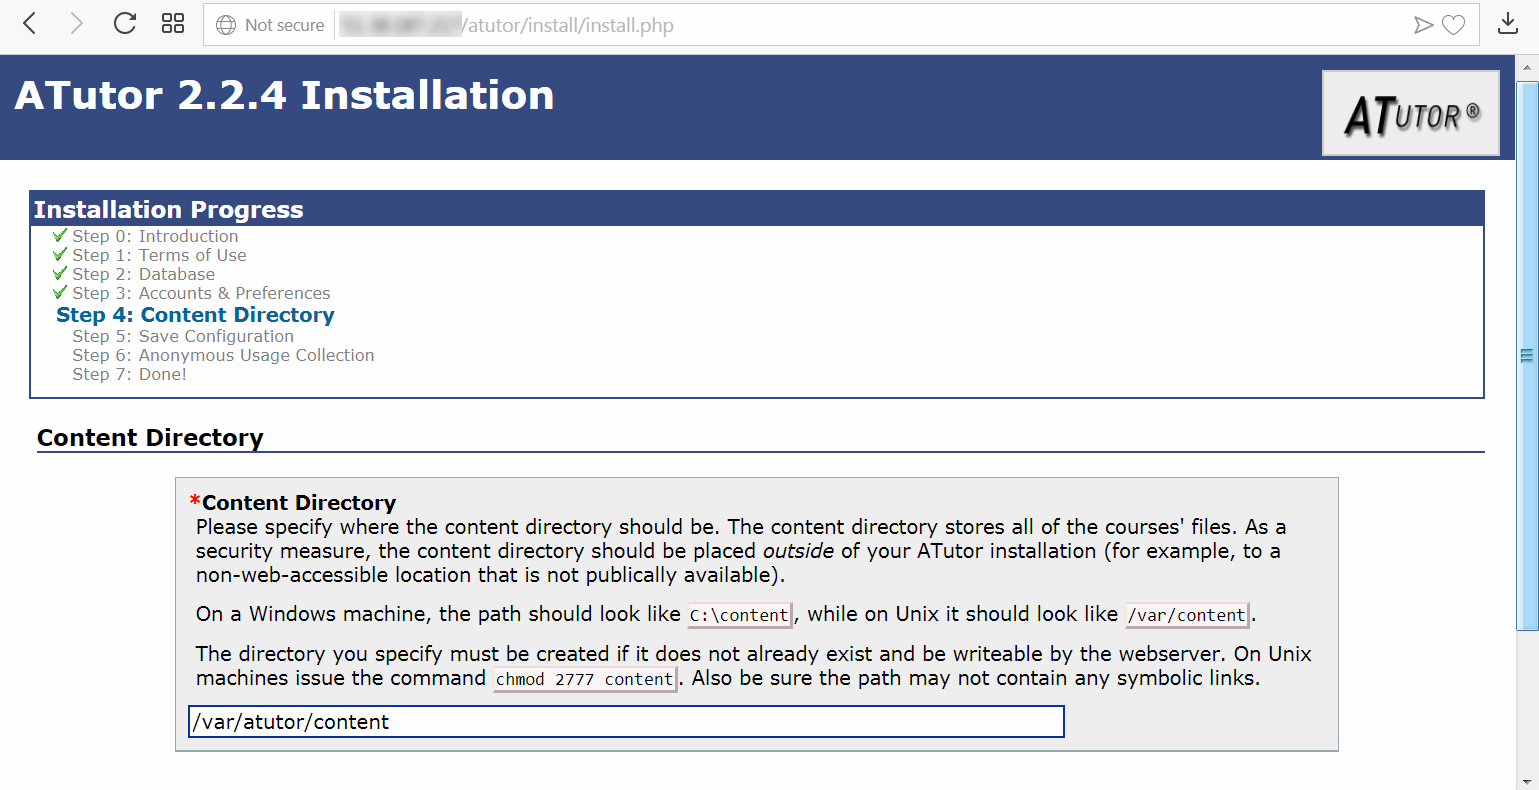
- define a content directory :
This directory contains the educational resources of your LMS .
That’s the reason why you should not allow internet users to access it .
And this , to prevent malicious acts , such as cheating , piracy , infringement of copyright or content modifications without your authorization .
In other words , you must create your content directory outside /var/www/html/ folder and make it writeable .
By the way , you do not have to just define this directory and create it later .
It must be created before continuing the procedure otherwise it will fail .
In practice ,
- return to Webmin file manager
- go to the /var/ directory
- create a subdirectory called atutor ;
To do that , go through “File” menu and select “Create new directory” .
Then , in “New directory name” field , enter atutor and create the folder .
- in this subdirectory , create another one named content , as before
- select the /atutor/ directory again by right-clicking on it
- click on “change ownership” ;
this menu enables you to run a command equivalent to the Linux chown
- user name : www-mydata:www-mydata
- group name : www-mydata:www-mydata
- tick “Recursively”
- validate the changes
- right-click /atutor/ folder again
- click on “change permissions” ;
this menu allows you to run a command equivalent to the Linux chmod 2777
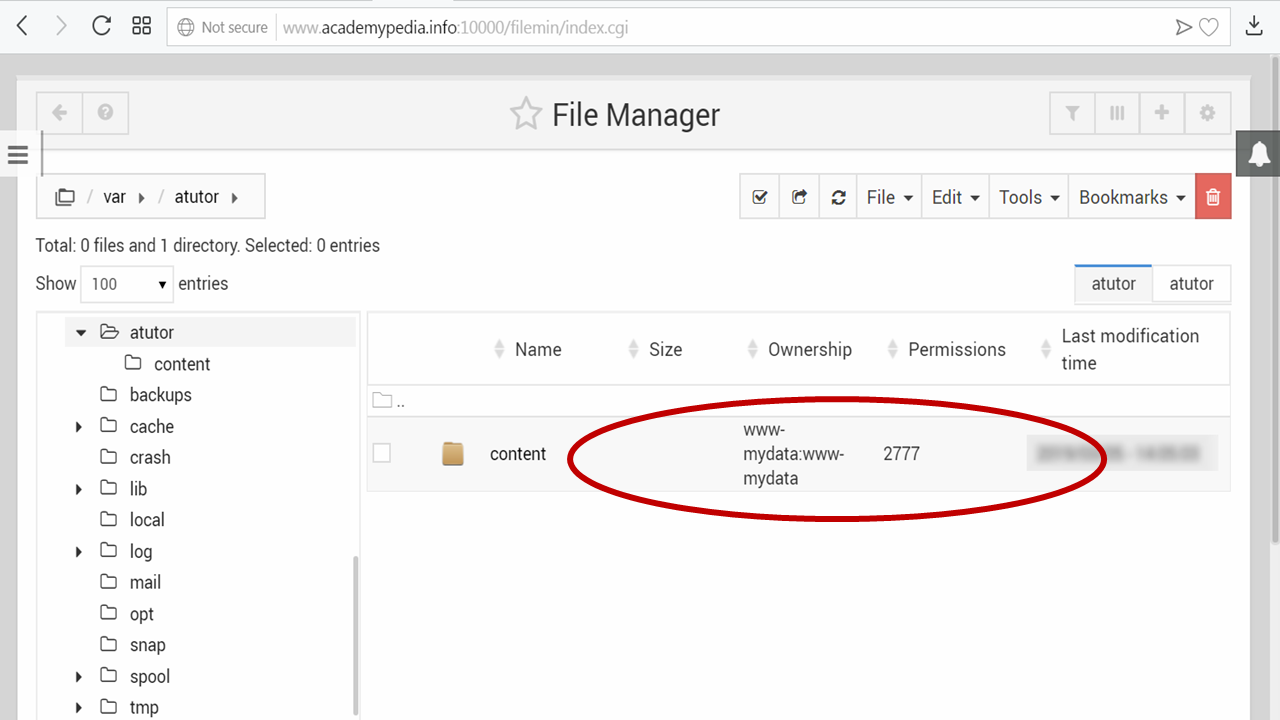
- enter 2777 in “permissions” field
- select “Apply to All ( recursive )”
- save changes
You get the following result :
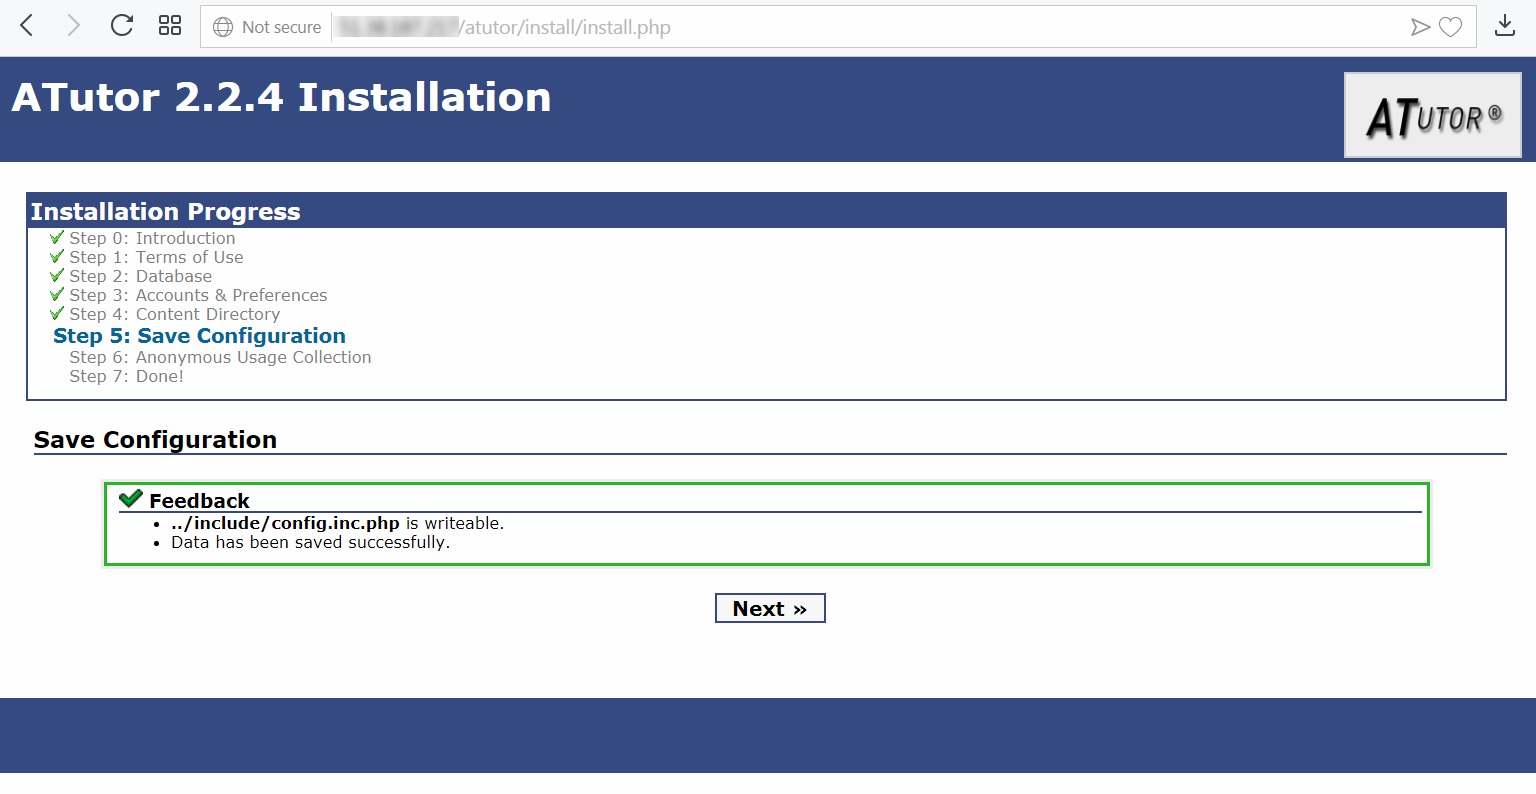
- The next step is to save your configuration in the config.inc.php file .
If you have used the same installation directories as in this tutorial , it should be located on your server under /var/www/html/atutor/include/ folder .
The next step is to save your configuration in the config.inc.php file .
If the procedure was successful , you should see the screenshot below .
If not , you have to create this configuration file yourself , in the directory mentioned above .
More precisely , drawing your inspiration from previous steps ,
- create config.inc.php file
( from the "File" menu , select "Create new file" )
- manage its ownership and permissions to make it writeable
( for the latter , choose this time for a value of 0666 instead of 0755 )
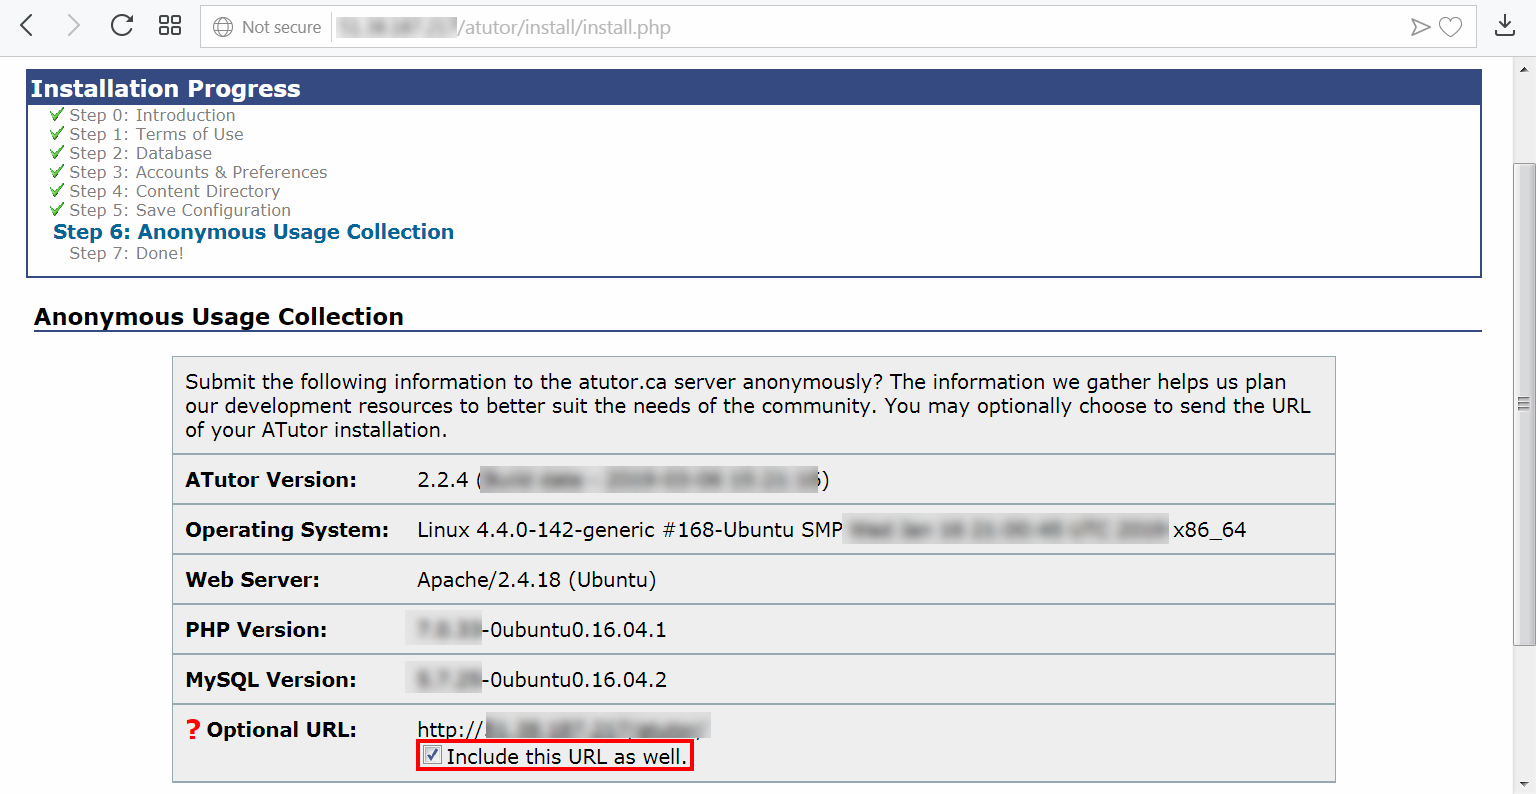
- The second to last stage of this installation allows you to participate indirectly in the collective effort concerning the development of ATutor LMS .
It collects system data from your server and sends it anonymously to the atutor.ca server .
These data are , more precisely :
- Your ATutor LMS version
- Name of your server operating system
- Name of your Web Server
- PHP Version of your VPS
- MySQL version of your server
However , you can choose not to send the Web address of your e-learning platform .
To do this , simply uncheck the option that includes this Url in the data transmitted .
Congratulations !
You’ve reached the final step of this installation procedure
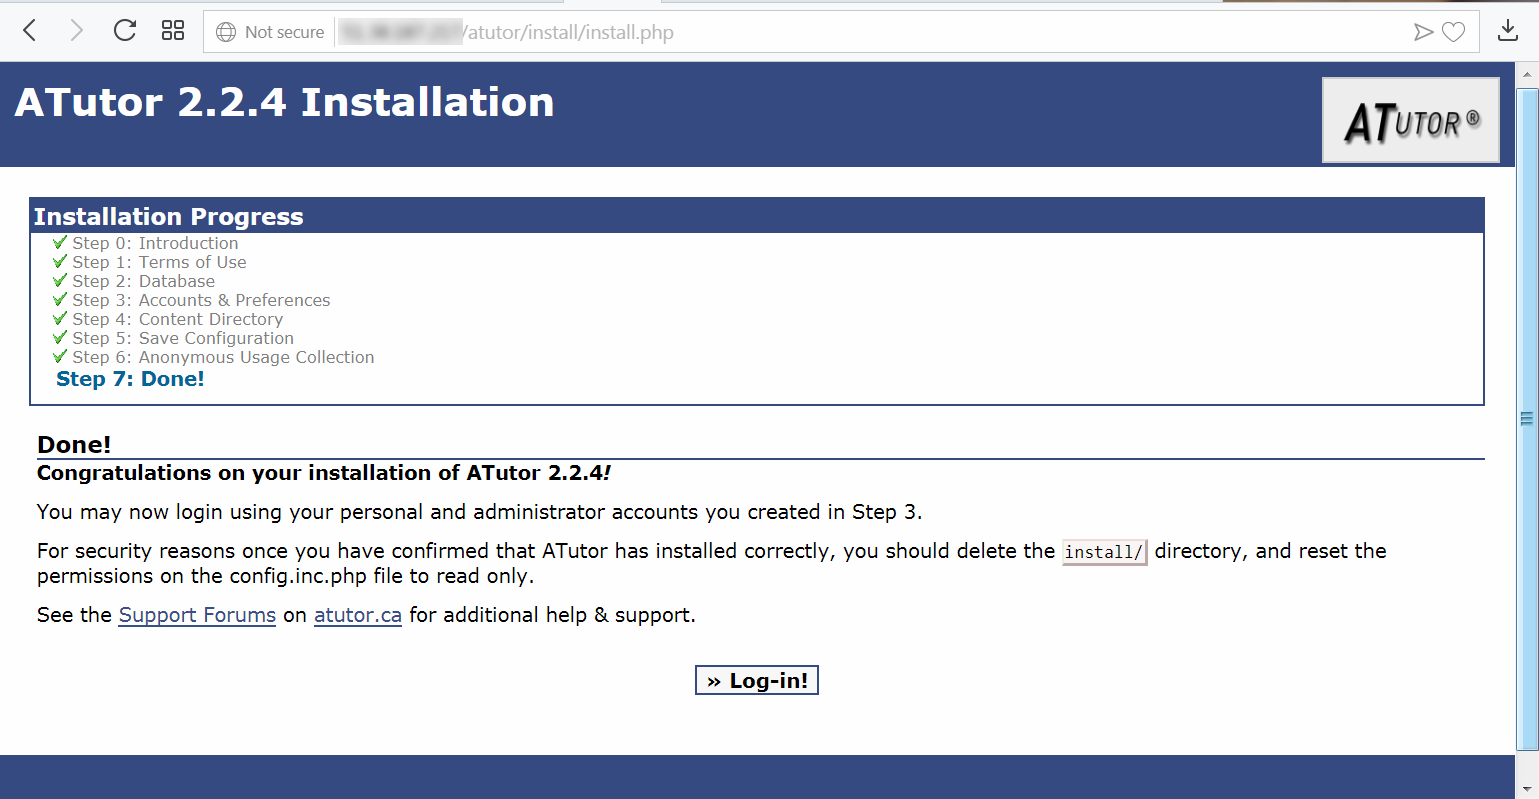
There are only 3 things left to do :
- the first is to remove the "install" subdirectory from your installation directory .
And this , for security reasons .
Indeed , this prevents malicious internet users from restarting an installation procedure , which overwrites the data of the existing one .
Your students and administrators would no longer be able to access courses , exercises or other educational resources .
At worst , hackers could use your platform to publish illegal information .
Having said that , I recommend that you make a local backup on your PC , before removing it .
Indeed , “install” folder contains a subdirectory called “db” , which stores all the SQL tables necessary for the proper functioning of your e-learning platform .
As a precaution , it would be better to keep a copy of these files , in a safe place .
Later , they could be used to repair or restore the SQL tables of your LMS , in the event of a problem .
How to locally backup this directory , using Webmin ?
Just a few clicks … ,
- go back to your file manager
- search for /var/www/html/[your_installation_directory]/include/install/ folder
- right-click on “db” folder
- select “download” option
- once downloaded , move the download-xxx.tar.gz archive to the backup folder of your choice , on your computer
Once all these measures are taken , right-click
on “install” folder and delete it or
- copy it to atutor_demo_[language]
- give its ownership to root:root with permission 2777 , recursively
- The second is to turn config.inc.php file ( currently writeable ) into a read-only file , again for security reasons .
For this purpose , change its permissions to 0444 .
- Last but not least_demo , all you have to do now is connect to your VLE , using your super administrator credentials !
ATutor LMS is now properly installed .
But its configuration still needs to be done !
Bonuses
Configuration procedure
Changing your VLE default language
First ,
-
-
-
-
-
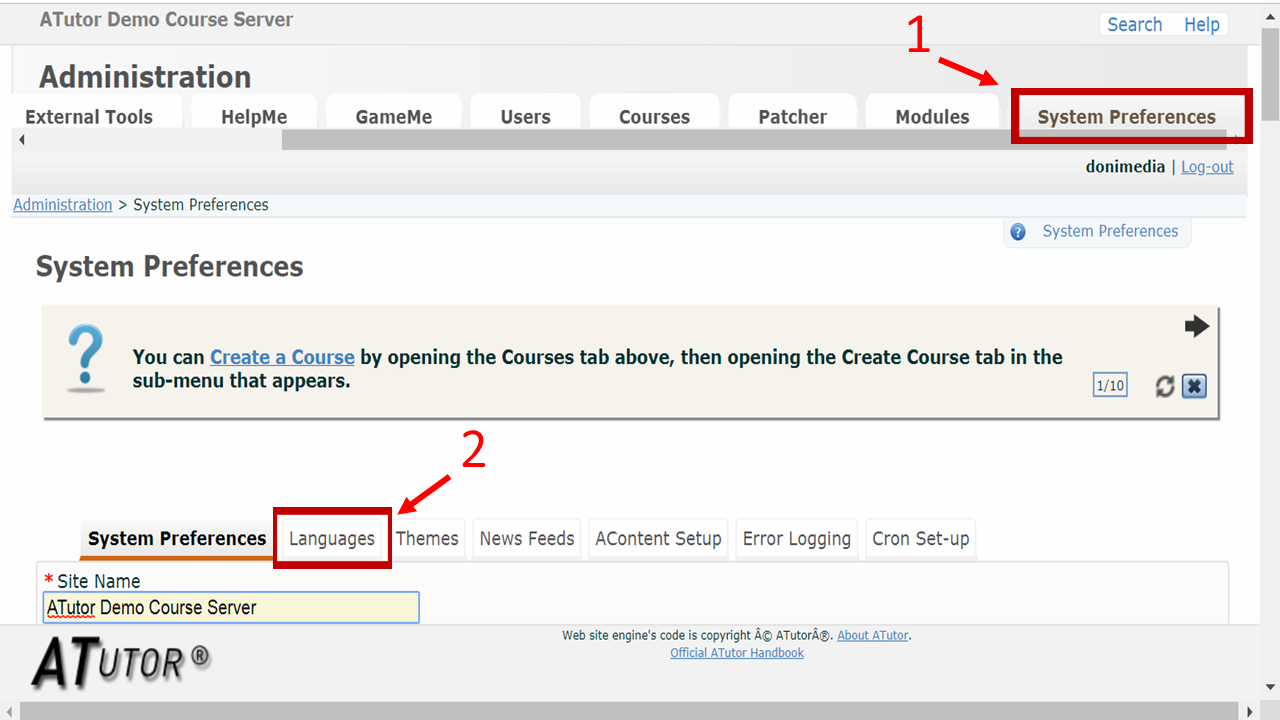
- go to your administration interface
- click on “System preferences” tab
- click on “Languages” tab
-
-
-
-
ATutor LMS offers you 3 ways to change the language of your VLE ;
- by translating a language that you have previously imported into your database ( "Translation" tab ) .
The advantage of this method is that you can filter the data to be translated , according to their category ( system messages , templates or modules )
However , to do this , you have to switch your LMS to translation mode , by setting AT_DEVEL_TRANSLATE variable to 0 , in [your-LMS-root]/include/vitals.inc.php configuration file .
The disadvantage is that in this mode , your users will also have access to the translation page of your e-learning site .
This poses security problems .
Better to use this option when you are sure that no user is connected ._

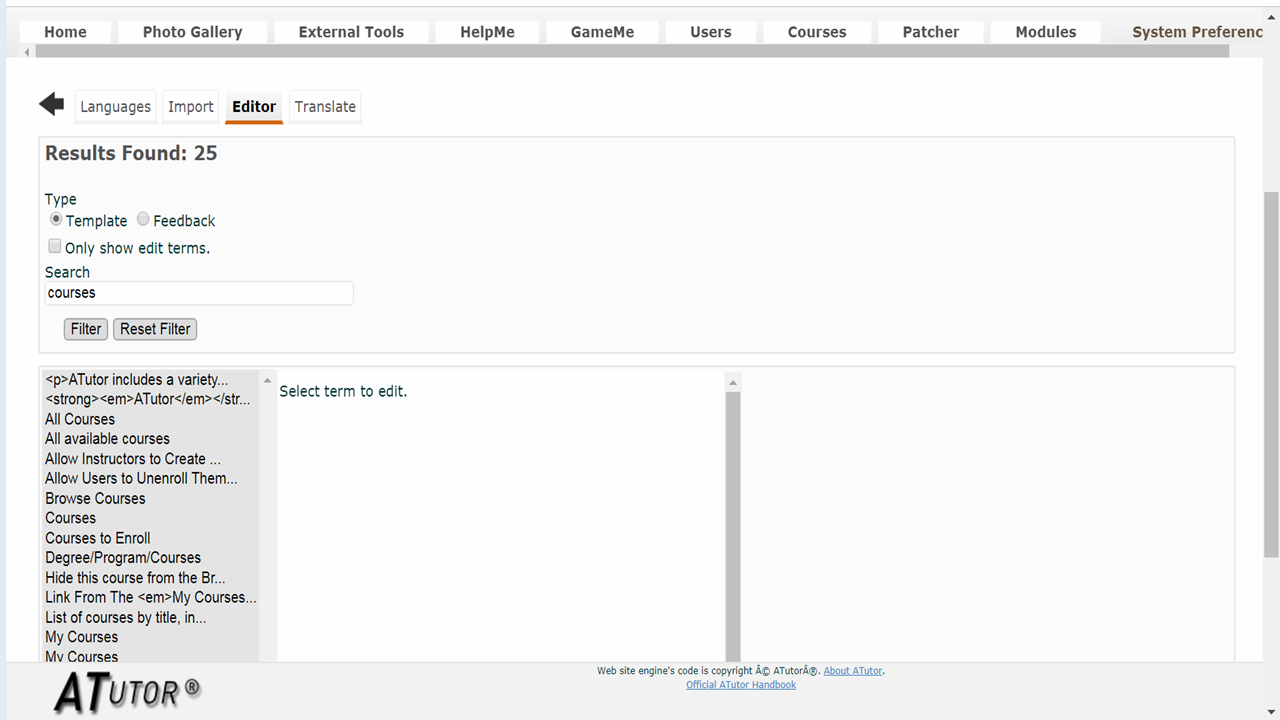
2. By editing and then translating a list of terms that , as before , are filterable by category ( "Editor" tab ) .
With the difference that the categories in question are this time "templates" and "feedback" .
It is worth noting that the translation of a specific term is also possible .
Simply tick the option "Only show edit terms" , which actually activates a search box
3. by importing language extensions from ATutorlangs , a collaborative platform dedicated to the creation and maintenance of ATutor LMS language packs ( "Import" tab ) .
Importation can be done in two ways ; manually or automatically .
In the first case , it's up to you to download the pack from ATutorlangs and upload it to your system .
To do so , click on "choose a new file" button , in "Import a new language section" .
In the second case , using the select menu , choose a language and then start the import .
This is by far the fastest and safest way to import a language pack in your LMS .

Your language pack is now imported into your learning management system , you can check it by clicking on the "Languages" tab .
However , this does not mean that it is activated .
Indeed , as you can see , even after import , the language of your VLE is still English .
To enable the imported language , you can either :
- at the bottom the page , switch your default language

- click on “Languages” tab and delete the default language , that is ; English

Changing your VLE default theme
To start with ,
- go to your admin dashboard
- click on “System preferences” tab
- click on “Themes” tab
Then , in “Themes for desktop computers” section ,
- select the theme of your choice , by ticking its checkbox
- validate it , by clicking “Enable” lower button
- at this point , you can try to see what it looks like on your site , using the "Preview" button .
- If it suits you , make it operational by clicking “Set as default desktop theme” button

It should be noted that administrators can develop their own themes , by duplicating them from the default existing ones .
The latter are available in [your-LMS-root]/themes/ folder .
Once enhanced , you can upload them into your e-learning platform .
- How to turn your ATutor e-learning platform into a demo site with limited access time ?
-
- What is the purpose of this time limitation ?
-
The interest of the demo site is that it allows users to test life size different features of your ATutor platform .
For example :
- course
- external tools
- modules
- patcher
- photo gallery
- system preferences
The problem is that malicious users could use these tools to download illegal documents and thus harm you .
To overcome this , a method ( called demo reset ) consists of periodically erasing your content and replacing it with the original one .
How to make your demo time limited ?
Prerequisites :
Before configuring your LMS to make it time limited , you must make sure your VPS server is able to unzip an archive .
To do this ,
-
-
-
-
-
- Connect to your server via SSH :
-
-
-
-
If your browser supports Java , you can do it with Webmin ;
-
-
-
-
-
-
-
- go to Webmin dashboard
- select “un-used modules” menu
- select “SSH login”
- use your SSH credentials to log into your server
-
-
-
-
-
-
If your server does not support Java , you still have the option to connect to it using a free SSH client , such as putty
-
-
-
-
-
- Update Ubuntu packages list :
-
-
-
-
sudo apt-get update
-
-
-
-
-
- Install zip and unzip packages your operating system :
-
-
-
-
sudo apt-get install zip unzip
-
-
-
-
-
- If the following commands do not generate an error , the packages are operational .
-
-
-
-
Here are the commands :
- zip -v
- unzip -v
Time limitation implementation :
Concretely , you can implement this countdown feature on your ATutor E-larning platform , by using an open source application ; Open reset demo .
This script created by Jefrey Sobreira Santos is available on the Github collaborative platform .
- Register for a new Github account or sign in your existing one
- Download “open demo reset” script as a .zip archive , at the following address :
https://github.com/jesobreira/open-demo-reset/archive/master.zip
- By using Webmin file manager , upload the .zip archive on your VPS server , to the root of your ATutor LMS
- Extract this archive to open-demo-reset-master folder , by right-clicking on it
- Set its permissions to 0777 and its ownership at your convenience , but both recursively
- open this new directory
- copy open-demo-reset-master/odr directory to the root of your learning management system
- go to odr folder
- edit config.inc.php file
Inside , define :
-
-
-
- TIME_INTERVAL , that is the time beyond which the demo must restart .
-
-
Set it to :
- 60*60*24 , if you opt for a start every 24 hours
- 60*60 , if you opt for a start every hour
- 60*5 , if you opt for a start every 5 minutes
-
-
-
- DEMO_FOLDER ; This is the root directory of your LMS .
-
-
In other words , the parent directory of open-demo-reset-master folder .
What is written in terms of relative path ; "../"
-
-
-
- BACKUP_FOLDER ; This is where a copy of the original root directory of your ATutor LMS demo version is placed .
-
-
At the end of the "TIME_INTERVAL" timeout , the copy will be used to recreate your VLE main directory , in order to erase all user modifications .
For security reasons , I strongly recommend that you rename this path .
Do not forget to rename also its corresponding directory .
Once done ,
- go to this backup folder
- delete its content ( that is , “example.php” file and “uploads” directory
- copy the entire root directory ( including open-demo-reset-master directory ) to this backup folder
- that being said , take
advantage of this to make a copy of the backup directory itself and put it in a safe place .
By “safe place” , I mean a folder outside /var/www/html/
( put another way ; in a folder not accessible to users )
Like
/var/atutor_demo_en/ atutor_demo_backup/
Indeed , it is better to be safe than sorry .
Finally , set permissions of this extra backup to 2777 and its ownership to root:root
-
-
-
- MYSQL_DUMP , this is the path to a copy of your VLE database .
-
-
To make it simple , you can leave this copy in odr folder .
In that case , you could name this path : ‘[your-LMS-database-name]_backup.SQL’ , to be as clear as possible
At the end of the countdown ( TIME_INTERVAL ) , this copy will be used by "Open Demo Reset" script , to replace the existing database by the original one .
Thus , erasing any user modification .
With this aim in mind ,
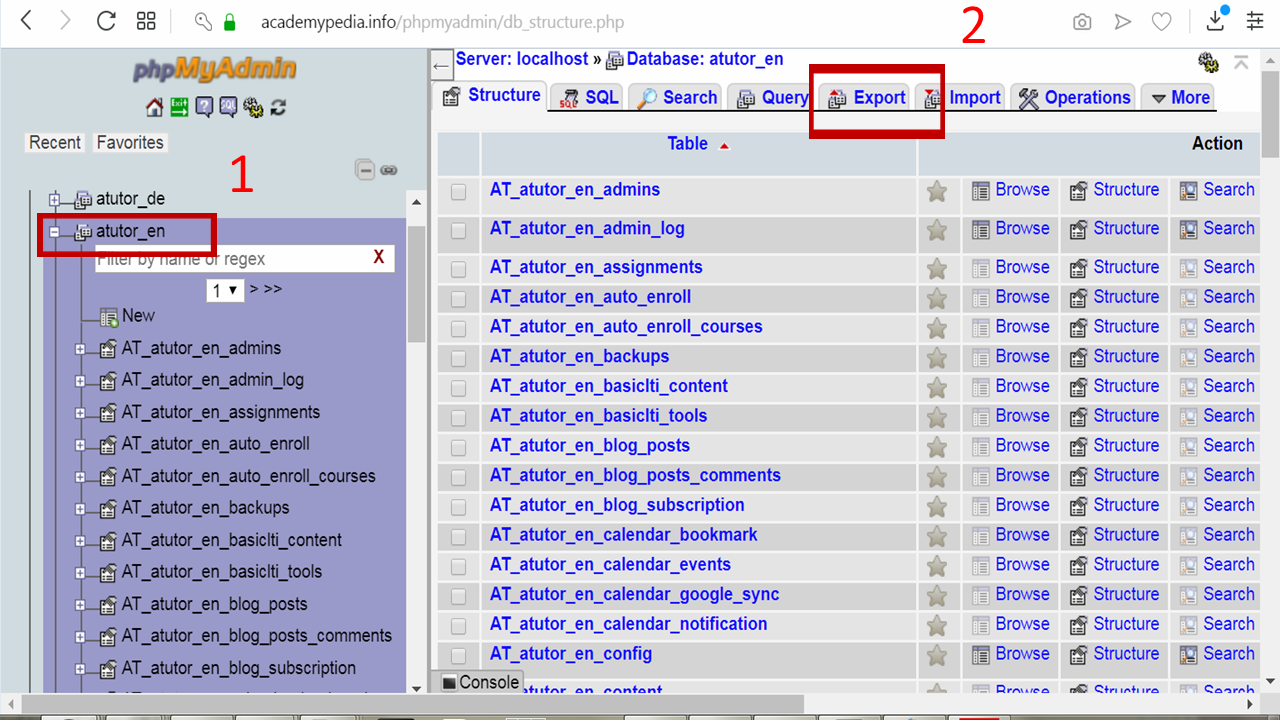
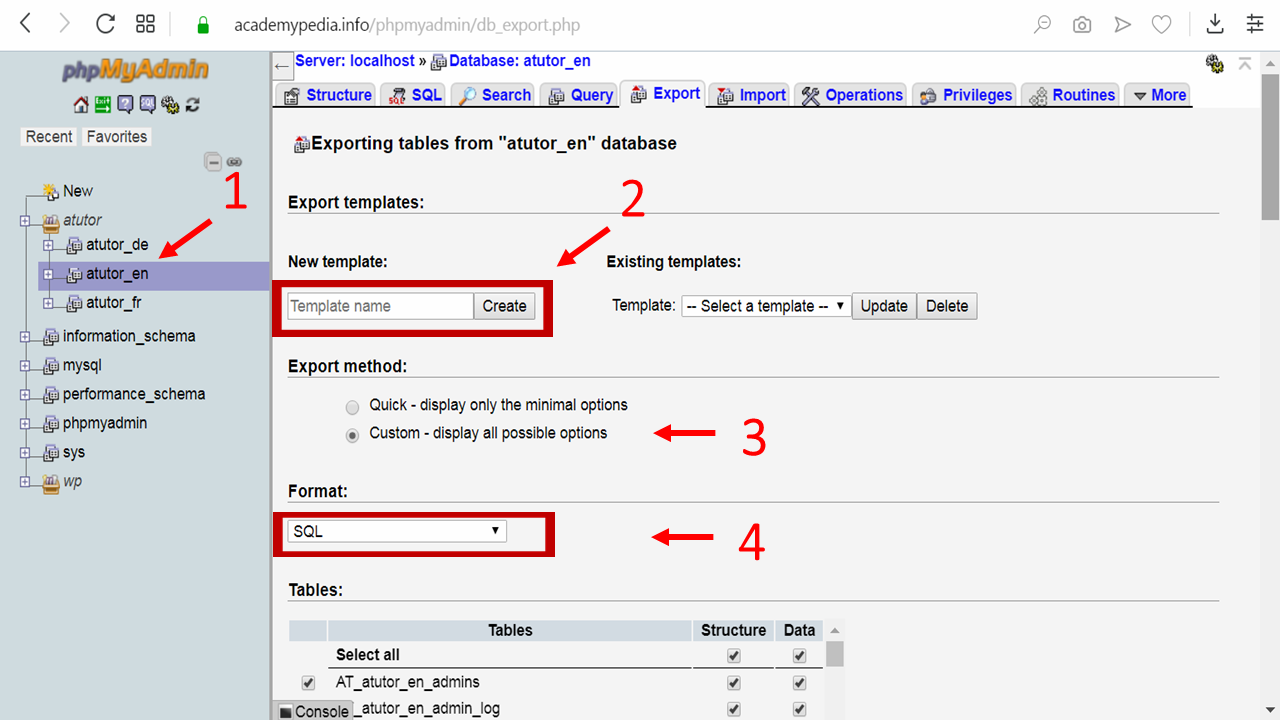
( see screenshot below )
- connect to PhpMyAdmin
- in the left tree view , select your ATutor LMS database ( atutor_en , for instance , as seen in the screenshot )
- then , click “Export” tab
-
-
-
- fill in “New template” field by entering a name for your MySQL dump .
-
-
( eg : atutor_en_backup )
-
-
-
- click on create button ; now your template name should appear under “Existing template” section
- opt for an SQL format
- in “Export method” section , choose “Custom – display all possible options”
-
-
-
-
-
-
- go to “Object creation options” section
- check the box that says : “Add drop table / view / procedure / function / event / trigger statement”
- save your settings by updating your template , in “Existing templates” section , on top of the page
- click “Go” button , at the bottom of the page
-
-
-

-
-
-
-
- PhpMyAdmin then starts exporting an SQL file , called [your-LMS-database-name].SQL
-
-
-
Once finished , upload this file to the specified location "MYSQL_DUMP" ( in config.inc.php ) , by means of Webmin file manager
-
-
-
-
- give it the same ownership as the other files in his folder
- rename it ; [your-LMS-database-name]_backup.SQL , to match MYSQL_DUMP name you’ve defined in config.inc.php
- still in odr folder , delete backup.SQL file ; it was useful just as an example
- also in this case , as a precaution , do not hesitate to make a copy of this SQL file , outside /var/www/html directory .
-
-
-
For example , in the directory previously used to backup a copy of your LMS root .
That is ,
/var/atutor_demo_en/ atutor_demo_backup/ , for example
-
-
-
- $ignore_files_n_folders ; as the name suggests , the list of files and directories that should not be deleted when resetting your e-learning system
-
-
-
-
-
- $db , variable containing the connection parameters to your MySQL database .
-
-
Namely , when we read from left to right :
- MySQL server ; in other words localhost
- a user granted to connect to your MySQL server ; eg : root
- this user password .
In principle , it is supposed to comply with MySQL security policy .
Put another way , it must contain alphanumeric but also special characters
-
-
-
-
- your LMS database name
-
-
-
( eg : atutor_en )
Now , you must declare “Open Demo Reset” as a javascript script in each page of your VLE .
For this purpose ,
-
-
-
-
- go to [your-LMS-root]/include/ directory
- edit header.inc.php file
- search for following code :
-
-
-
<script type="text/javascript" src="'.AT_print($_base_path, 'url.base').'jscripts/lib/jquery.switch.min.js"></script>
-
-
-
-
- replace it by this one :
-
-
-
<script type="text/javascript" src="'.AT_print($_base_path, 'url.base').'jscripts/lib/jquery.switch.min.js"></script>
<!– odr – Open Demo Reset –>
<link rel="stylesheet" href="odr/style.css" type="text/css" />
<script type="text/javascript" src="odr/odr.js.php"></script>
<!– /odr –>
-
-
-
-
- save and close the file
-
-
-
Next step is to keep a backup of your LMS root folder inside odr folder itself .
To that end ,
-
-
-
-
- go back to your VLE root directory
- select all files and folders ( except odr directory )
- copy and paste all that in odr backup folder .
-
-
-
That is , if you use the same naming rules as in this tutorial :
[your-LMS-root]/odr/[your-LMS-database-name]_backup/ directory
The following points are particularly important :
-
-
-
-
- go to [your-LMS-root]/odr/[your-LMS-database-name]_backup/
- In this directory , create a new odr folder
- set its permissions to 0777 and give it same ownership as the other folders
- once done , go back to
-
-
-
[your-LMS-root]/odr/
-
-
-
-
- copy all its files and folders
- return to [your-LMS-root]/odr/[your-LMS-database-name]_backup/odr/
- paste all files and folders into it
- As a precaution , go back to [your-LMS-root]/
-
-
-
-
-
-
-
-
- set permissions 0777 to all its files and folders of your LMS root folder , recursively
- give it the ownership of your choice ( eg www-mydemo: www-mydemo , recursively
-
-
-
-
Provided you declared this ownership previously in Webmin .
If not ,
- go to Webmin dashboard
- click on System menu
- click on Users and groups menu
- Click on “Create a New user” button
- Fill in the form , as you’ve done at the beginning of this tutorial
( Cf “Prerequisites” section )
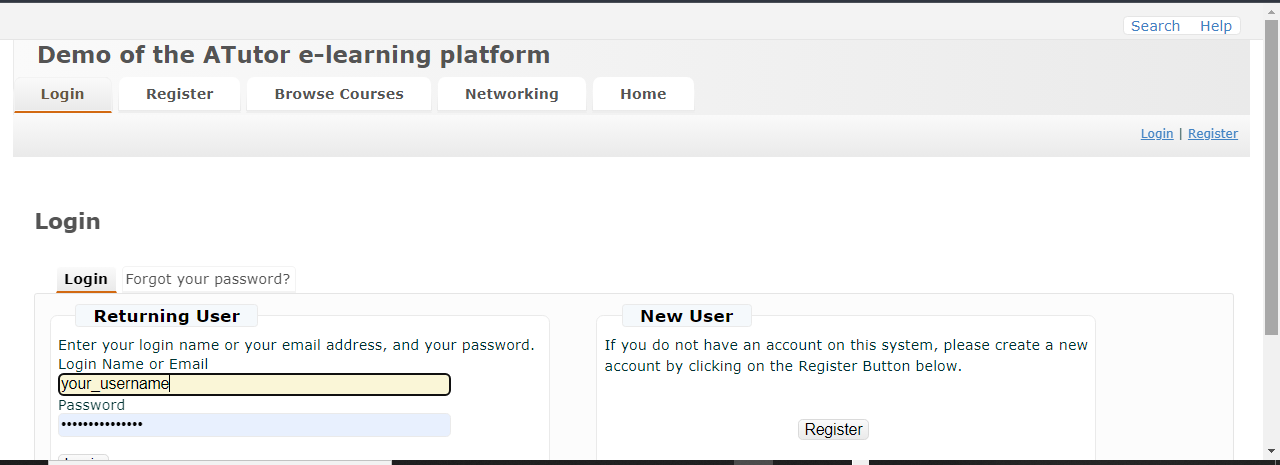
All you have to do now , is to log into your ATutor LMS demo .
You should see a boot splash screen for a few seconds .
Then a countdown , at the bottom left of your home page .
Try ATutor Demo on our Sever :
Tips & tricks :
- How to easily find the path to your ATutor LMS installation directory , using Webmin ?
Webmin is a user-friendly server management interface .
However , it is sometimes frustrating , when you are in the file manager to have to find again the directory on which you worked , following a mistake of manipulation ( inadvertent click on a directory or a link , browser refresh , etc … )
To easily find the path to a directory via Webmin , the best is to add it to your bookmarks .
To that end ,
-
-
-
- click on Webmin "Others" tab
- click on "File manager"
- select “Bookmarks” menu
- click on “Bookmark current directory”
-
-
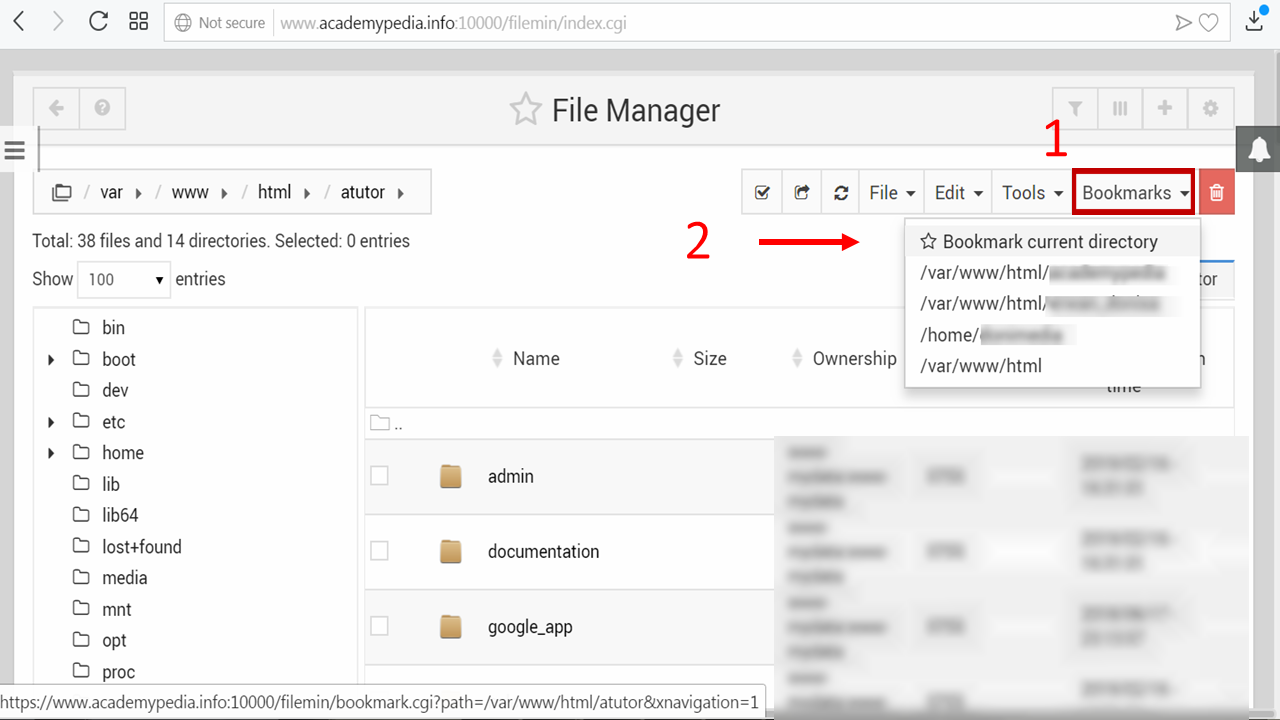
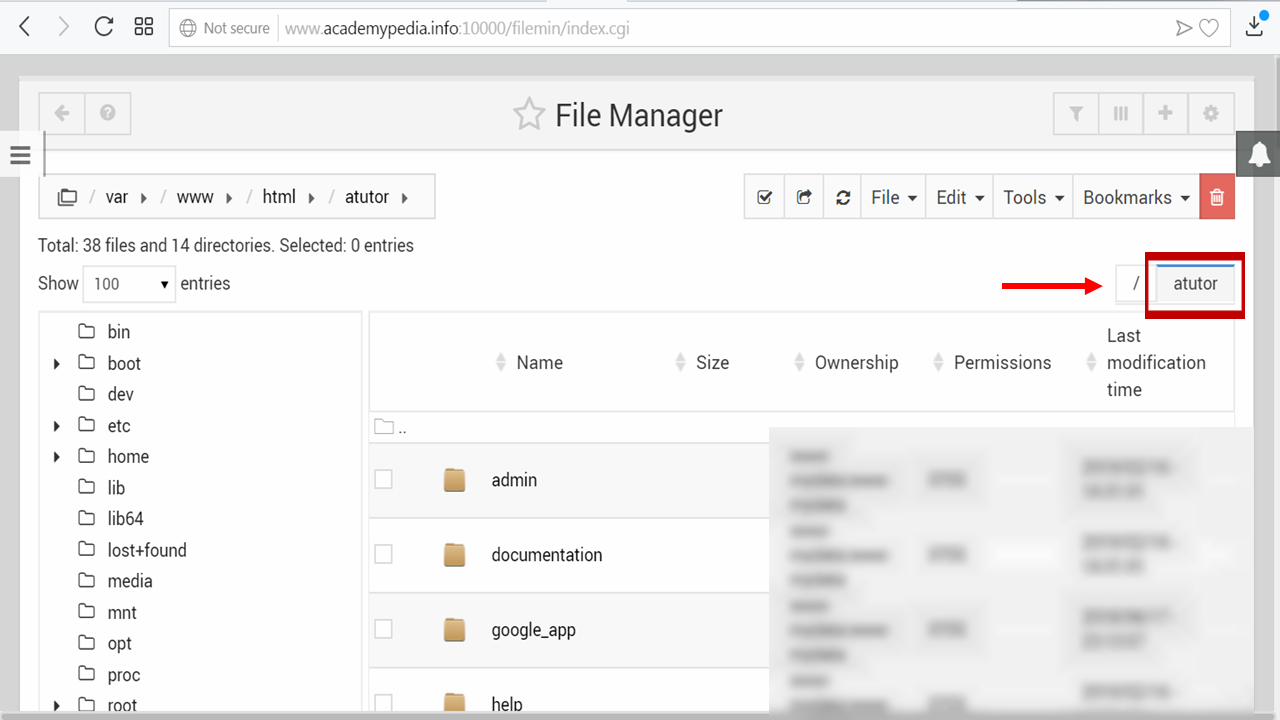
- a shortcut to the current directory is now created on the right side of your file manager :
Troubleshooting :
Normally , if you follow this procedure , you should not have problems installing your managed learning environment ( MLE ) properly , on your VPS server .
But if that's the case , I'll give you some techniques to help you solve them .
- What techniques do you have to diagnose the problems ?
-
-
- Creating and running a PHP file that contains phpinfo() :
-
In principle , this tool should be familiar to you , since its use has already been discussed in the "Prerequisites" section of this tutorial .
It helps you to determine which PHP extensions are active and therefore to infer which ones are not .
In other words , it enables you to verify that the PHP environment of your VPS server is in compliance with the minimum required for installing your LMS .
2. Switching your platform to debug mode :
It is a mode which , in term of development , is said "verbose" .
That is , it allows your ATutor platform to display in real time the data of its PHP scripts and , in particular , session variables , configuration variables or error messages .
By analyzing this data , one thing led to another , it is easier for you to find the source of the problem , by tracing it back .
So , how to proceed to enable the debug mode of your distance learning platform ?
Well , actually it's pretty simple .
Just change the AT_DEVEL parameter to true !
In concrete terms ,
-
-
-
-
- go back to your Webmin control panel
- click on "Others" menu
- click on "File manager" menu
- go to the “include” folder of your installation directory .
-
-
-
( eg : /var/www/html/atutor/include/ )
-
-
-
-
- right-click on “vitals.inc.php” file and edit it
- look at the beginning of the file for the following instruction :
-
-
-
define('AT_DEVEL', 0);

-
-
-
-
- in this line of code , change 0 to 1 , to enable debug mode
- save and close Webmin editor
- make sure that it is enabled , by refreshing the home page your VLE .
-
-
-
You should see now , near the bottom of this page , the data ( and possibly error messages ) that I mentioned earlier .
- Case studies
-
- The installation procedure went well .
-
Nevertheless , when you go on the platform , you notice that several words are in square brackets .
In addition , the following error messages are displayed ;
[ the_follow_errors_occurred ]
[ AT_ERROR_DB_QUERY ]
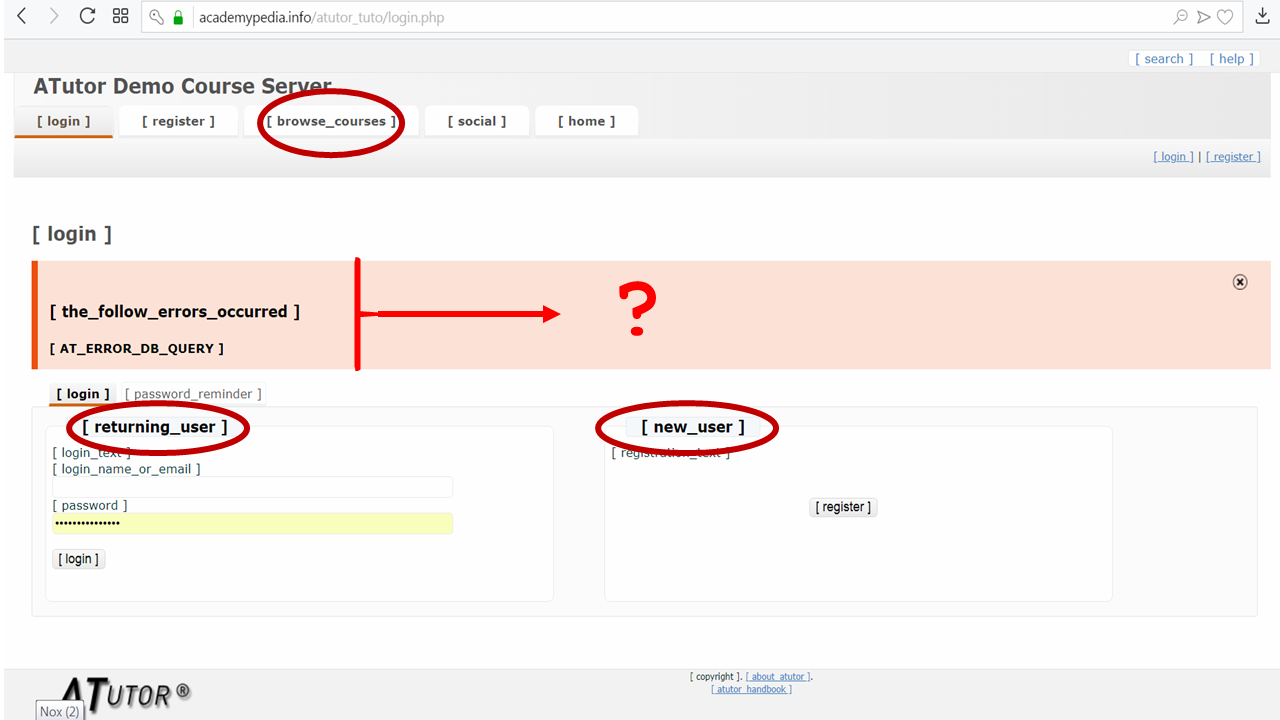
What can it be ?
- First reflex ; switch to debug mode , following the previously indicated method
- Then , refresh the home page of your platform
- Now , session and configuration variables as well as error messages are displayed at the bottom of the page , as below :

As the screenshot shows , the error message [AT_ERROR_DB_QUERY] is much more detailed than before .
This , thanks to the "verbose" mode of the AT_DEVEL command .
You now have more information about the source of the problem .
Indeed , by looking more closely , we see that a key element of the platform is absent ; the MySQL 'atutor_tuto.AT_tuto_language_text' table .
( Of course , in your case , replace "atutor_tuto" and "AT_tuto_" by respectively the name of the database and the table prefix you gave in step 2 of the installation procedure )
4. As the name suggests , this table matches the raw text of the LMS ( that is , the text in square brackets ) with its default language ( that is , here , English ) .
Without this table , only plain text is visible .
5. You can quickly check that this table is actually missing from your database , by connecting to it via phpMyAdmin .
To achieve this ,
-
-
-
-
- paste and search the following address , in your browser :
-
-
-
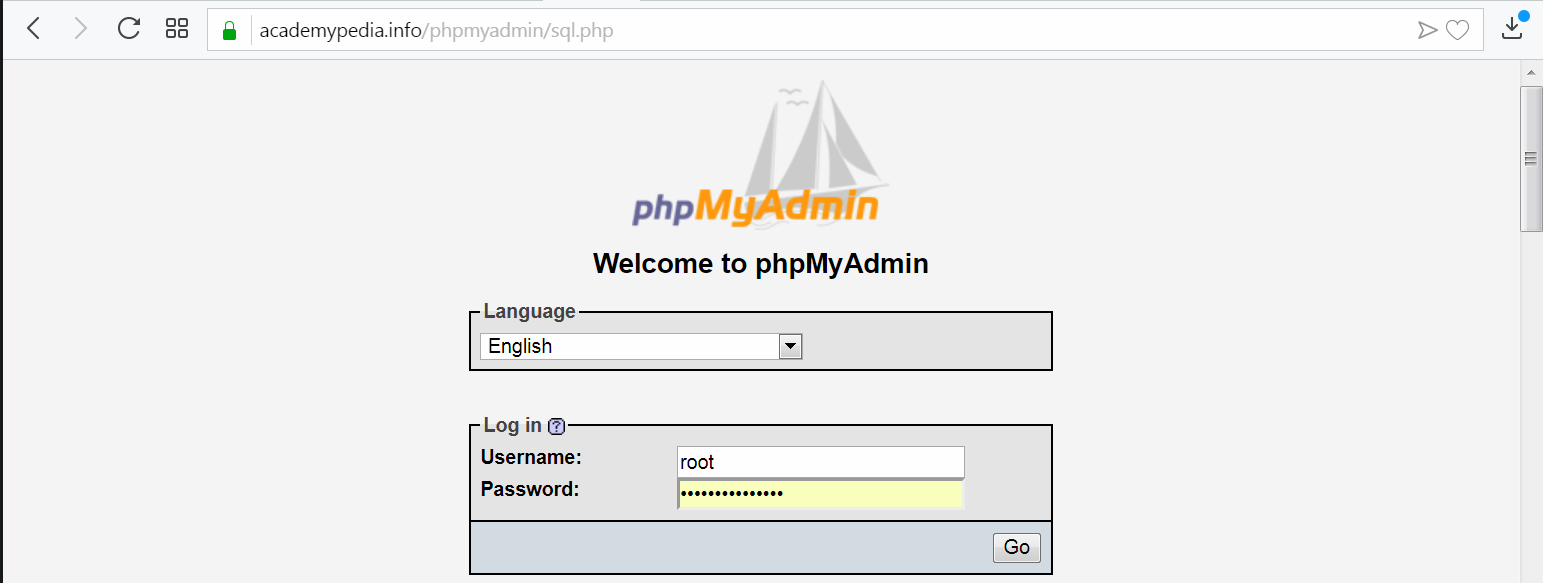
http://ip_address_of_your_VPS_server/ phpmyadmin
-
-
-
-
- log into phpMyAdmin , using an account granted with all privileges
-
-
-
( like root or an equivalent )
-
-
-
-
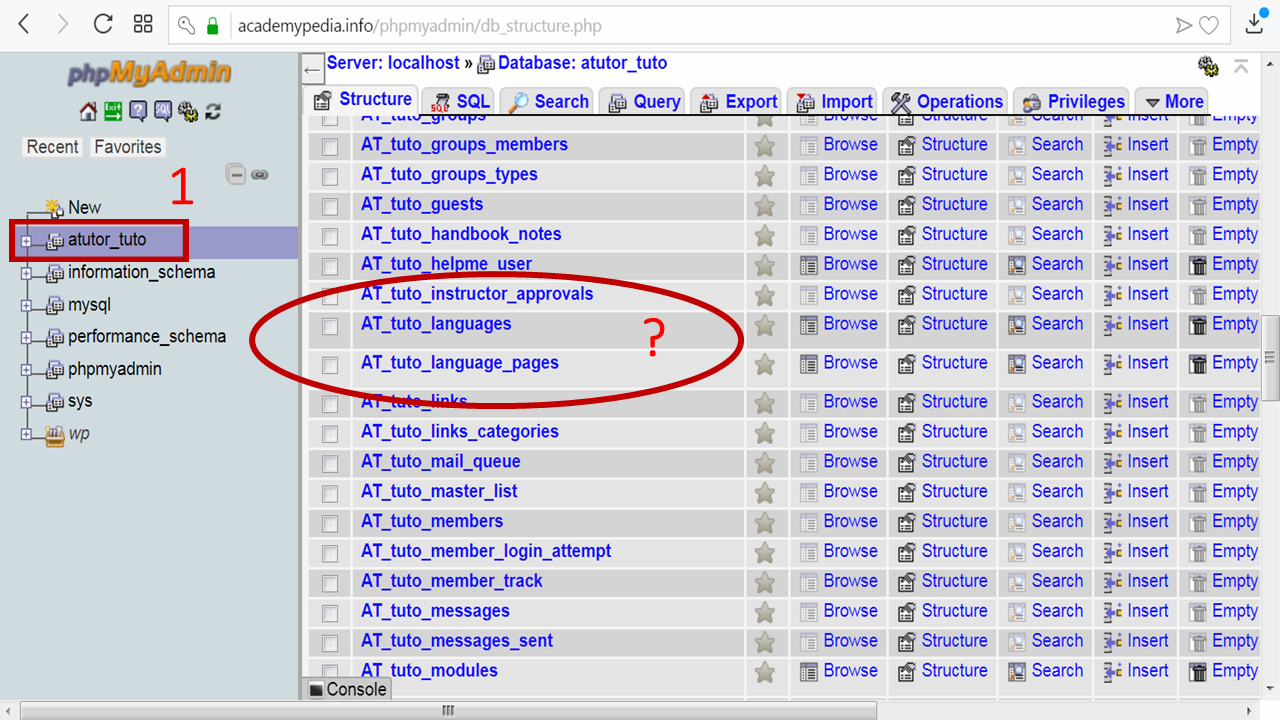
- select your ATutor LMS database
-
-
-
( atutor_tuto , in the case of this tutorial )
-
-
-
-
- knowing that MySQL tables are , by default , sorted alphabetically in phpMyAdmin , search for “[your_table_prefix_]language_text" table .
-
-
-
( that is , here ; AT_tuto_language_text” )
Did you find it ?
If not , it is actually missing
6. To fix the problem , the best is to recreate this table .
So , how to proceed ?
In the last step of the installation procedure , I recommended that you save the “/include/install/” subdirectory in a dedicated folder , on your local pc .
It is this backup that will allow you to restore the missing MySQL table .
In order to achieve this , I assume that 7zip file archiver is installed on your computer , as recommended in the “Prerequisites” section of this tutorial .
If this is not so , you can download it freely , from its official website .
That being said ,
-
-
-
-
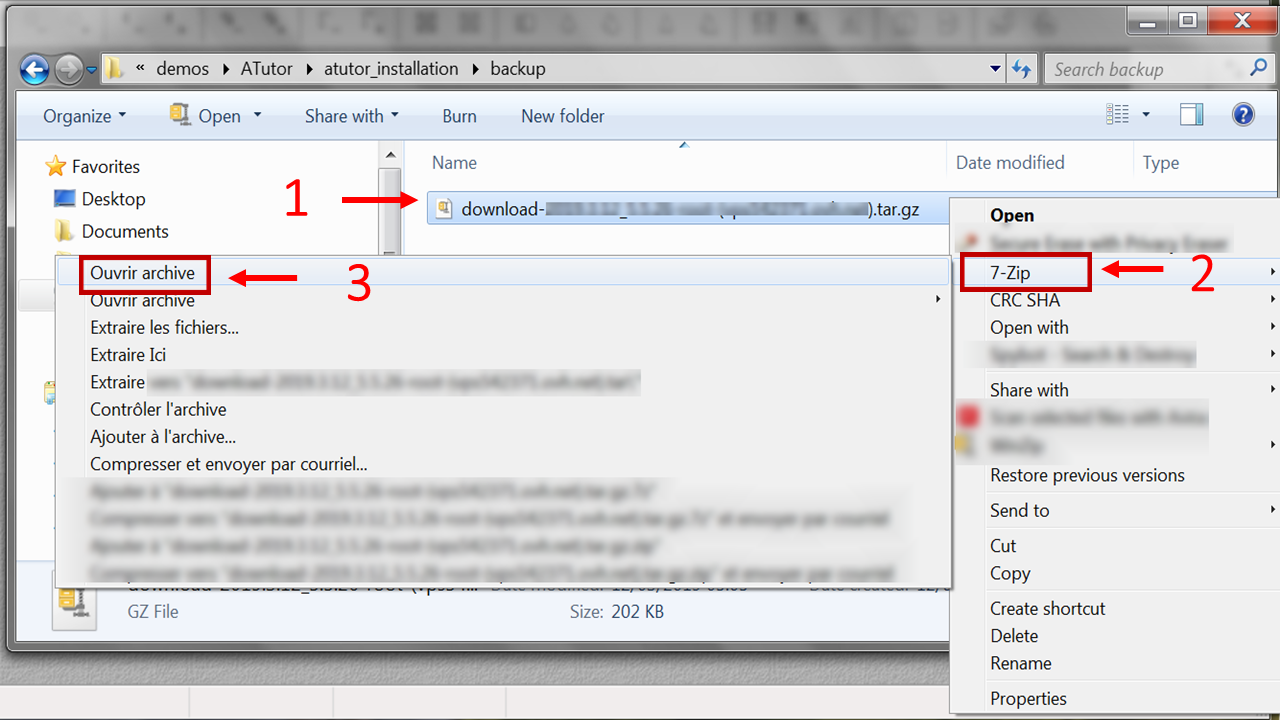
- on your local pc , return to the directory containing the backup archive of the “/include/install/” folder
- right-click on this archive
- select “7zip” menu
- click on “Open archive”
-
-
-
-
-
-
-
- once the archive is open , click on “download-xxx-yyy.tar” file inside
- click on “db” folder
- in the list of *.SQL files that appears , search for “atutor_language_text.SQL” , at the top
-
-
-
-
-
-
-
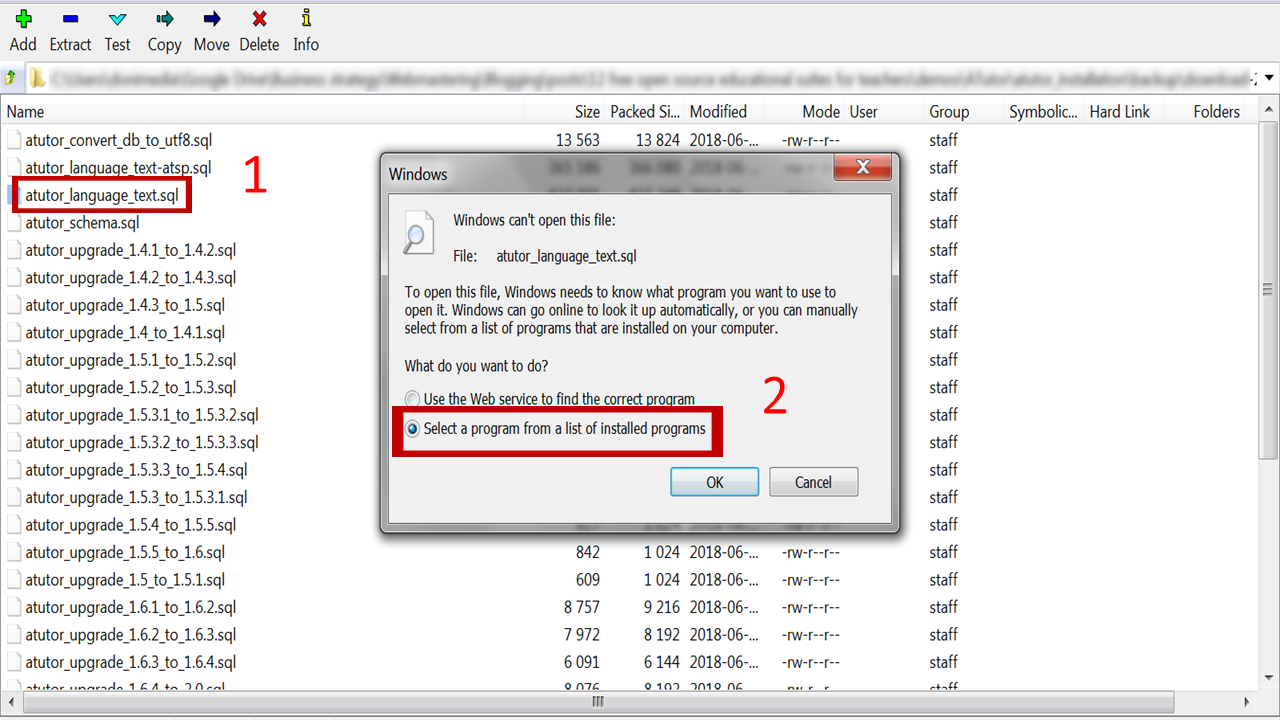
- click on “Open outside”
- tick “Select a program from a list of installed programs” and click Ok
-
-
-
-
-
-
-
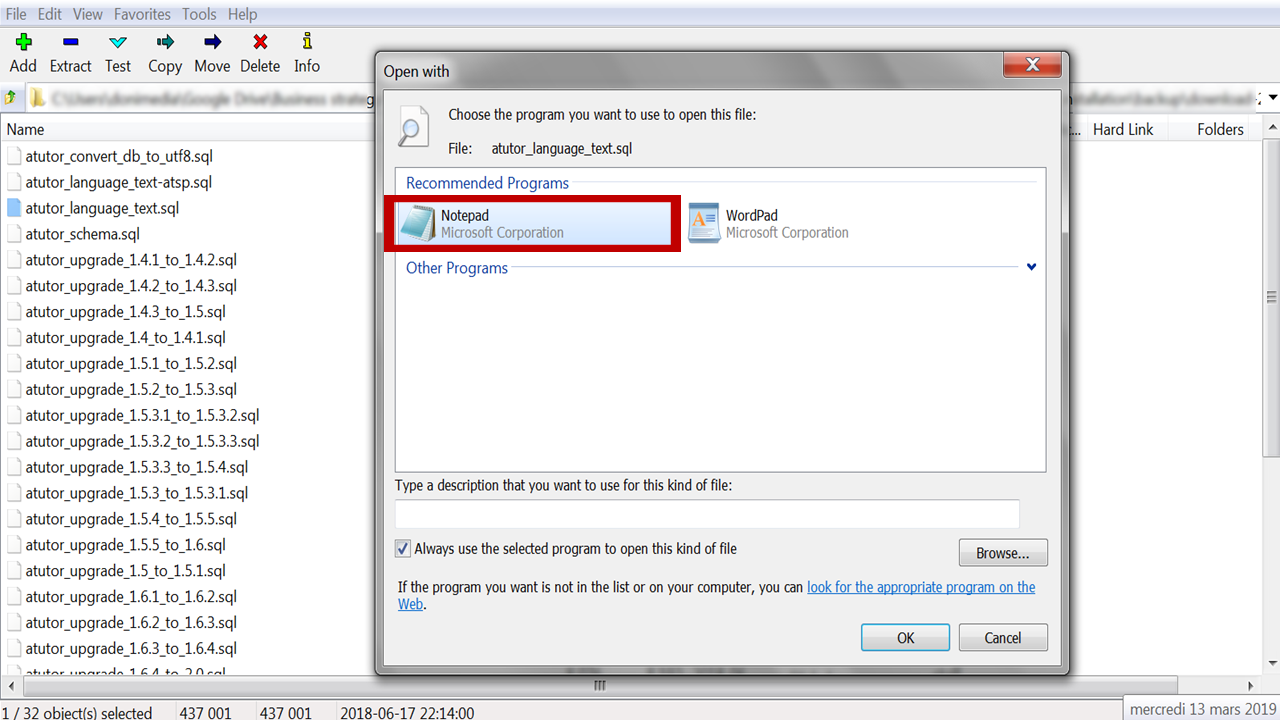
- in the list of recommended programs , select “Wordpad” , preferably .
-
-
-
Indeed , this editor has the advantage of presenting a formatted text .
Unlike its equivalent Notepad which often tends to present a plain text
-
-
-
-
- click Ok
- First of all , as a precaution , make a backup of this file ( without closing it ) , in your backup directory
- Then , on close observation , you can notice that its first line of code is :
-
-
-
DROP TABLE `language_text`;
This SQL query indicates that you want to delete the “language_text" table from your database .
It is inappropriate here because it implies that this table already exists .
However , it is not the case ; we've seen it before , using phpMyAdmin .
In order to avoid an error being generated when executing this SQL query , we have no choice but to "comment" it , that is to say ; to disable it , in developer jargon .
To do so , simply place a hash sign , at the beginning of the line , as follows :
# DROP TABLE `language_text`;
Great , you did it ! But now , You must modify “atutor_language_text.SQL” to adapt it to your database .
Indeed , the SQL queries it contains should not be used to create the table “language_text” but the table “[your_table_prefix]language_text” .
( where [your_table_prefix] represents the table prefix you chose , in step 1 of the installation procedure )
Hence the following steps :
-
-
-
-
- click on “Select All”
- click on “Replace” menu
- in “Find what” field , enter language_text
- in “Replace with” field , enter [your_table_prefix]language_text
-
-
-
( eg : AT_tuto_language_text )
-
-
-
-
- click “Select All” again
- right-click on the highlighted text and copy it
- select all the text and copy it
- return to phpMyAdmin dashboard
- click on your ATutor LMS database
- click on “SQL” tab
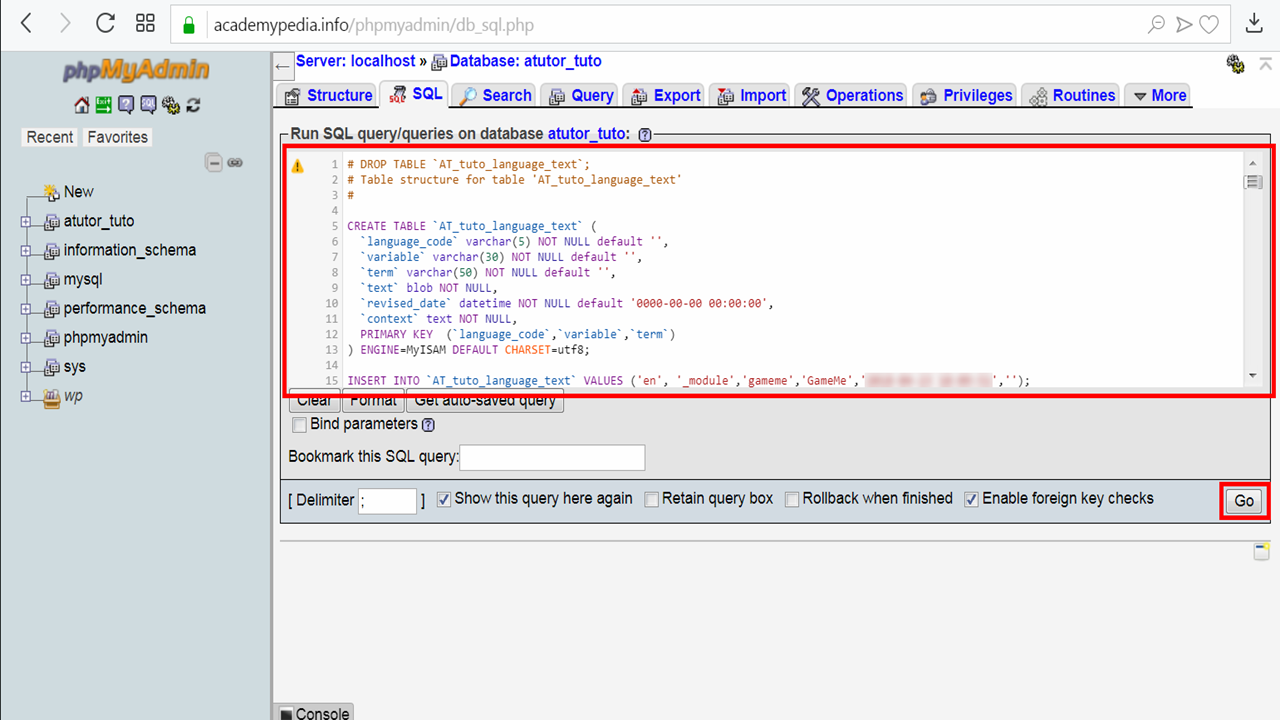
- paste “atutor_language_text.SQL” content into the editor , as follows :
-
-
-
-
-
-
-
- click on “Go” button
- if everything went well , you should read this type of message ;
-
-
-
“1 row affected”

-
-
-
-
- a look at the list of MySQL tables in your ATutor LMS database should also confirm this :
-
-
-

-
-
-
-
- just like refreshing the homepage of your LMS ; there is no more text in square brackets .
-
-
-
Menu names are now displayed correctly
-
-
-
-
- save and close the file
-
-
-
7. However , it may not happen as well and that the error message below appears :
Error
SQL query:
CREATE TABLE `language_text` (
`language_code` varchar(5) NOT NULL default '',
`variable` varchar(30) NOT NULL default '',
`term` varchar(50) NOT NULL default '',
`text` blob NOT NULL,
`revised_date` datetime NOT NULL default '0000-00-00 00:00:00',
`context` text NOT NULL,
PRIMARY KEY (`language_code`,`variable`,`term`)
) ENGINE=MyISAM DEFAULT CHARSET=utf8
MySQL said: Documentation
#1067 – Invalid default value for 'revised_date'
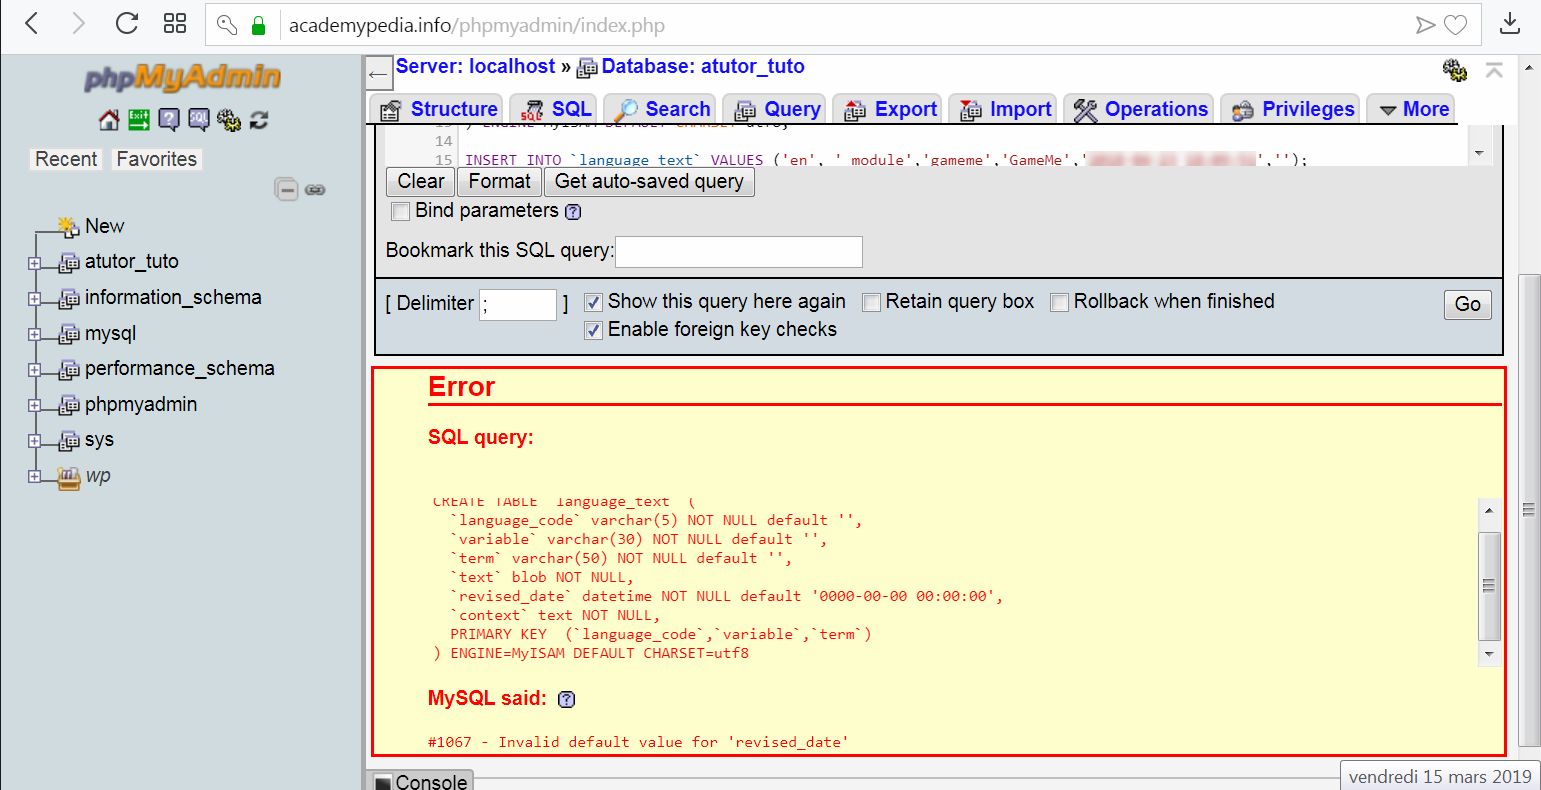
8. So where does the problem come from ?
The most important part of the above message is its very last line ; the one starting with #1067 .
It tells you that the problem comes from the date , the date format , more precisely .
In fact , this problem occurs when your MySQL database is configured in strict mode .
What is MySQL strict mode ?
This is a restrictive mode of data processing .
In this mode , if an SQL query ( for example , creating or updating a table , inserting values ) handles incomplete or invalid data , then it is not executed and an error is generated .
Conversely , if this mode is disabled , the data processing is more permissive .
In other words , the values are readjusted to fit the allowed formats and simple warning messages are generated
9. How can you check if the strict mode is activated or not , in your database settings ?
Via phpMyAdmin , a quick way to do that is to :
- select your LMS database
- under “SQL” tab , in the editor , type the code below :
SELECT @@GLOBAL.SQL_mode global, @@SESSION.SQL_mode session
- click “Go” button in order to run that query
- then , you will have confirmation that strict mode is enabled , if you read this type of message :
Global : ONLY_FULL_GROUP_BY,STRICT_TRANS_TABLES,NO_ZERO_IN_…
Session :
ONLY_FULL_GROUP_BY,STRICT_TRANS_TABLES,NO_ZERO_IN_…

10. So , what steps do you need to follow to create your “language_text” table , under these conditions ?
You can proceed in 3 phases :
- globally but temporarily deactivate the strict mode in order to
- execute the SQL queries necessary for the creation of the missing table
- then , restore the strict mode
How to carry this out , in concrete
terms ?
- copy “language_text.SQL” content as previously , with WordPad
- return to phpMyAdmin control panel
- go back to your ATutor LMS database
- select “SQL” tab
- in the editor , disable strict mode temporarily , by typing this code :
SET GLOBAL SQL_mode = '';
This technique is to be used with caution .
Indeed , the use of the “Global” modifier indicates that the changes made to the system variable it precedes ( “SQL_mode” , to be precise ) affect all user connections but also all SQL queries .
- click on “Go”
- return to “SQL” tab
- paste “language_text.SQL” content into the editor
- click “Go” again
- it is to put an end to the “Global” modifier effect that , in this last phase , we reactivate the strict mode by typing :
SET SQL_mode = 'STRICT_TRANS_TABLES';
- You can proceed in the same way as in step 5 of this case study to verify that the missing table is now installed
11. Now that everything is working properly
, you still have to disable the debug mode .
To do this , refer to step 1 of this case study , this time setting the parameter AT_DEVEL to 0 .
This has the effect of disabling the “verbose” mode of your VLE and thus the display of session and configuration variables .
In addition , subsequent error messages will be less detailed .
Did you encounter any problems
when installing your ATutor platform ?
Don’t hesitate to let me know ,
leaving me a comment .
